Sprite Shader Effects with Unity and Shader Graph, Part 1: Getting Started
Shaders, those mysterious programs that somehow instruct the GPU how to render objects and effects in our games, are a great way to introduce effects that make your game stand out from the crowd. However it can be quite daunting figuring out where to start and how to write even the simplest shaders. They’re written in esoteric languages and have a variety of peculiarities that make them difficult to pick up, but because they’re so important in game development we all end up writing, modifying or at least trying to understand shaders at some point.
Over the last few years, visual shader editors such as Unity’s Shader Graph have started to alleviate that pain point by simplifying the process of implementing hundreds of common shader routines in a node-based editor. You can now drag and drop all kinds of nodes including noise generation, logical operators (AND, OR, NOT, etc.), time, world and local positioning, plenty of math operations, texture sampling, and the list goes on and on. You can then connect these nodes, wiring them up in a drag-and-drop editor, to create all kinds of interesting outputs which can then be attached to a material like any other shader. This can take a lot of the pressure off of developers in trying to understand the nuances of shaders, while also giving shader developer pros some perks as well as you can now tweak and preview your shaders in real time from directly within Unity.
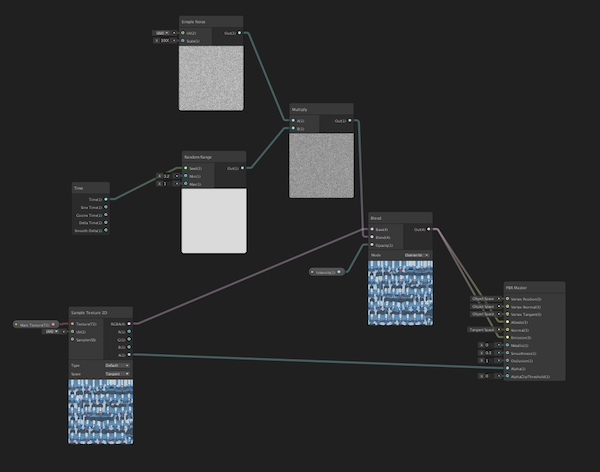
The graph above renders a static effect on top of a sprite, which will be the outcome of the next post in this series. Don’t worry if you think that Shader Graph is just a slimmed down shader editor though, it’s fully capable of handling more sophisticated shaders as well so it’s well worth learning even if you’re already an advanced shader developer. Shader Graph can be used to create all kinds of effects, from water and liquids to glow, cel-shading, tessellation… you name it.

In this post I’ll show you how to setup Shader Graph to work with 2D sprites, and then in the follow up posts linked below we’ll recreate some interesting effects seen in real games. I certainly don’t claim to be an expert on shaders, but I’ve figured out enough over the years to create some interesting effects and for me Shader Graph has been a big help in unlocking more proficiency in working with shaders, so hopefully you’ll be able to come out of this series with that as well.
If you’re already familiar with Shader Graph, I’d suggest skipping ahead to one of the follow up posts. If not, the rest of this post will go over setting up Universal Render Pipeline and Shader Graph in your project, and rendering a simple sprite sheet animation using Shader Graph and the Sprite Renderer component.
Links
- All the code for this series can be found on Github at kylebanks/unity-shader-graph-sprite-effects.
- Part 2 of this series, where we’ll recreate the static damage effect from Axiom Verge, can be found here.
What You’ll Need
- Sprites: I’ll be using the Toon Characters 1 spritesheet from Kenney, but feel free to use your own sprites.
- Unity: I’m using Unity version 2019.3.15f1, but any recent version of Unity should do the trick.
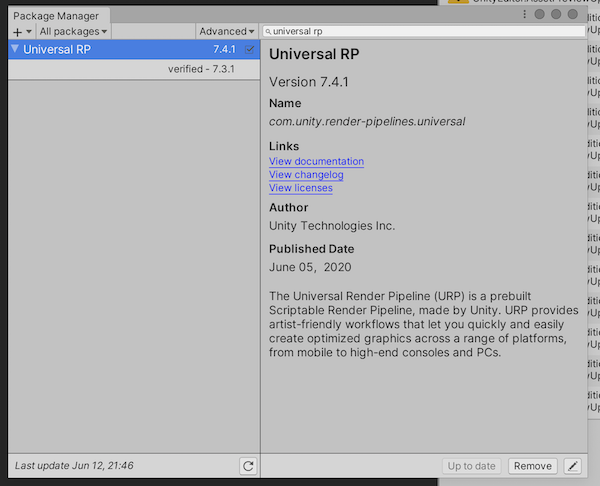
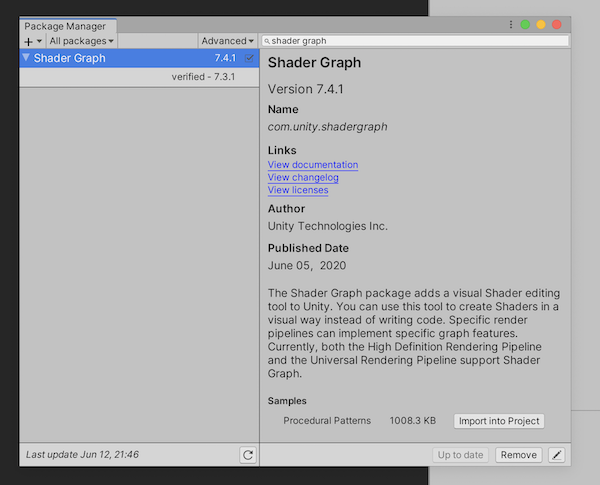
- Universal Render Pipeline and Shader Graph: From the Package Manager window (Window > Package Manager) make sure you have Universal RP (short for Universal Render Pipeline) and Shader Graph installed. I’m using versions 7.4.1 of each, the latest at the time of writing.
Project Setup
Before we get into the Scene setup, we’ll need to create a default Render Pipeline and set it in our project settings. If you haven’t worked with Universal Render Pipeline or any of the scriptable Unity render pipelines, essentially we just need to tell Unity how we want the scene to be rendered, which is just using default settings.
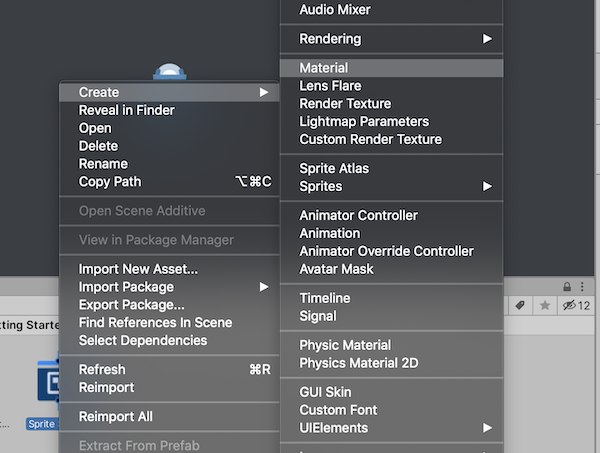
To do this, in your Assets folder right-click and select Create > Rendering > Universal Render Pipeline > Pipeline Asset (Forward Renderer):

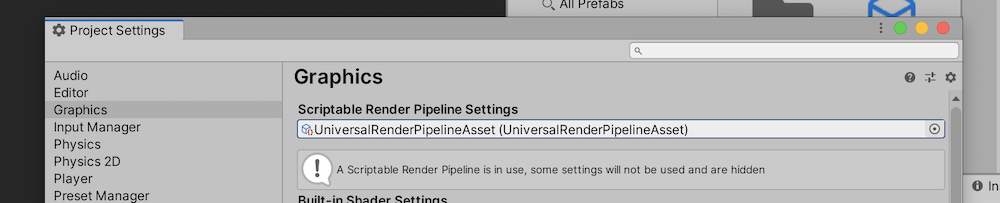
This will create two assets, a UniversalRenderPipelineAsset and a UniversalRenderPipelineAsset_Renderer. We’ll leave these at their default settings as we’re not doing any custom rendering, but we’ll need to instruct unity to use our pipeline asset anyways. To do this, open up the project settings editor using Edit > Project Settings and head to the Graphics tab. From there, set the Scriptable Render Pipeline Settings to the UniversalRenderPipelineAsset you just created.
What this has done is essentially to instruct Unity that we’re using the Universal Render Pipeline, and that we want to render using the default Universal Render Pipeline settings.
And with that, we’re ready to start setting up the scene.
Scene Setup
We’re going to start with a really simple scene, with just three game objects:
- The first game object you’ll need is of course your Camera. I’m using a default Camera with the Background Type set to Solid Color. This is completely optional, feel free to keep your current camera settings if you’re working in an existing scene, but for this demo I’ll be using a simple solid background color to keep the focus on the sprite and effects.
- The second game object is just the default Directional Light that is part of the scene when you create it. We don’t need to make any changes here, and again if you’re using your own scene then this isn’t going to play a role at all so don’t worry if you have your own lighting.
- The final game object will consist of a Sprite Renderer. You can optionally add an Animator if you have a sprite sheet you’re working with. The Animator doesn’t have any impact on the shader effects, but it’s nice working with animated sprites anyways just to see how it’s going to look when the effects and sprite animations are combined.
I’m using the robot sprite from the Toon Characters 1 spritesheet I linked above, but again feel free to use whatever sprites you have available.
You should have something like the following, with a simple sprite being rendered to an otherwise default scene:
Just in case you have any troubles now or further on, here’s my full scene setup so you can replicate it in your own project.
Shader Graph
So now we have a sprite being rendered, perhaps with a little animation, but we’ll need to do a little ground work to get the sprite rendering with Shader Graph. If you look at your Sprite Renderer you’ll notice it has a Material property, with the value set to Sprites - Default.
This is the default material for all sprites in Unity, which in turn uses Unity’s default sprite shader. We can’t make modifications to this material or shader directly as they’re shared throughout Unity, and so in order to apply our own shader logic to the sprite we’ll need to create our own shader and material assets. Rather than writing the shader by hand, we’ll be using the Shader Graph tool to simplify the process.
Rendering Sprites with Shader Graph
Creating a Shader and Material
Alright, so first up we’re going to need to create a new shader to render our sprite. We’ll start by creating a Sprite Lit Graph by selecting Create > Shader > 2D Renderer > Sprite Lit Graph (Experimental). The difference between the two, Sprite Lit Graph and Sprite Unlit Graph, is just that the unlit variant isn’t effected by lighting in your scene whereas the lit one is. Depending on your game you may want to go with the unlit version, but for most usecases I’d say the lit version is preferred.
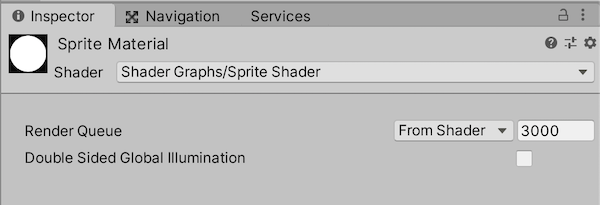
You can go ahead and rename the Sprite Lit Graph asset to anything you like, I’ll just name it Sprite Shader for simplicity. Before we can use the shader we’ll need a material to render on, so go ahead and create a material as well by right-clicking your shader and selecting Create > Material. I’ll name this Sprite Material.
Before moving on, make sure that your material is configured to use your shader by selecting it and viewing the shader property in the inspector. You should see something like so Shader Graphs/Your Shader Name:
Using a Custom Material with a Sprite Renderer
Back in our scene, it’s time to replace the default material on our Sprite Renderer. Drag and drop your new material onto the Material property of your Sprite Renderer. You’re going to see a warning in the inspector referring to a missing _MainTex property:

This is telling you that the Sprite Renderer is expecting a _MainTex property on whatever material it uses, in order to supply the sprite texture data to the shader. Indeed, if you try running your game now the results aren’t promising:
This probably isn’t the effect you’re going for - but hey, if it is then congrats, you’re done! Assuming you want to see your sprites in all their color and glory, we’ve just got a little bit of work to go in order to add the _MainTex property and render our sprite.
Creating Properties and Rendering Textures
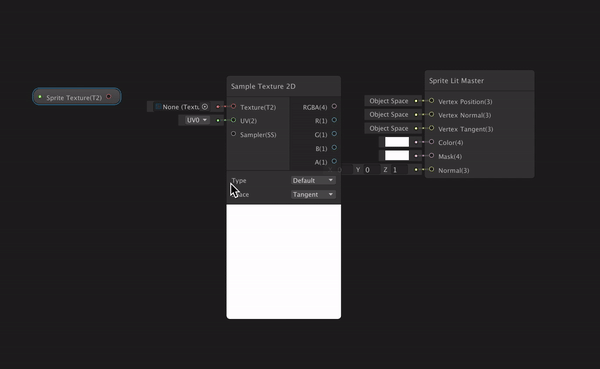
In the Project panel let’s go back to our new Sprite Shader asset and double-click it to open up the Shader Graph editor. You’ll see an empty Shader Graph view like so, with just a Sprite Lit Master node, a Main Preview window (if you don’t see this, click the Main Preview button in the top right of the window), and an empty list of properties in the top left.
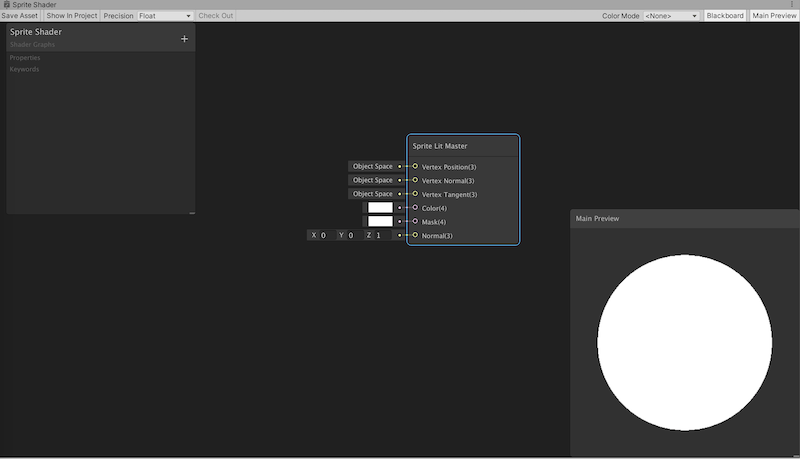
The Sprite Lit Master node is where we want to direct our output, and you’ll notice it has a few properties we can set such as Color and Normal. The one we’re interested in here is Color, which tells the shader how we want to color our surface. We’re not currently setting any value here so it’s just using a default color value of #FFFFFF which is why our Main Preview and our in-game sprite are both rendering as a flat white.
In order to supply the needed values to the Color property, we’re going to create a node to represent our sprite texture, another node to sample that texture, and then direct that output to the Color property on the Sprite Lit Master node.
First let’s create the sprite texture node. Right-click and select Create Node (or simply press the space bar) to bring up the Create Node dialog. From there, search for Texture 2D Asset and select it from the list.
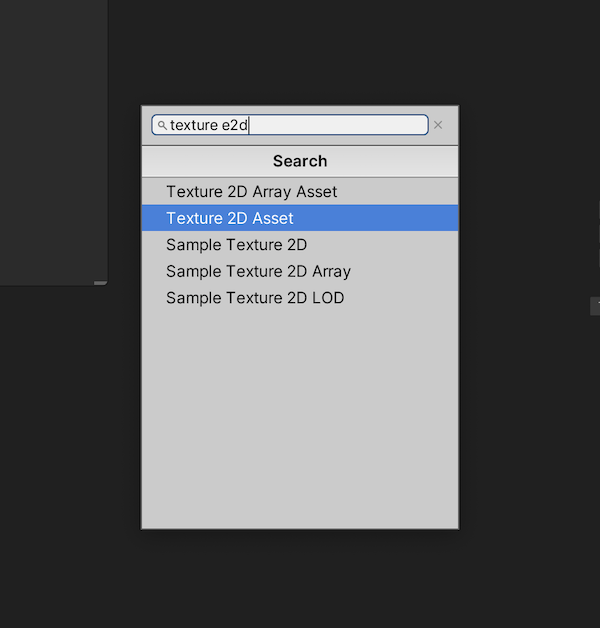
This will create the Texture 2D Asset node in our graph, which will allow us to reference a 2D texture asset from our project. A sprite, for instance! Notice that it has a Texture parameter which is currently set to None. We’ll need to supply our sprite texture to this node somehow, so in order to do that we’ll convert the node into a property which allows us to supply the value in the material inspector, or at runtime.
Right-click the Texture 2D Asset node and select Convert to Property. This will add an entry into the Properties window in the top left, which we can rename to something more meaningful by double-clicking the name at the top - I’ll simply rename mine to Sprite Texture.
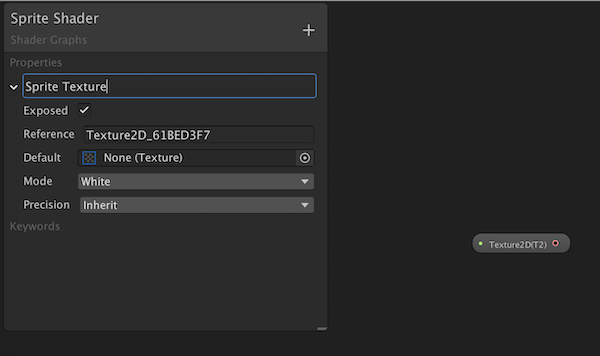
While we’ve given our property a name, this is really just for human convenience and not actually useful within code. From code when you want to apply values to a material at runtime, such as the Sprite Renderer is going to try to do with it’s sprite texture, we use the Reference value to do so.
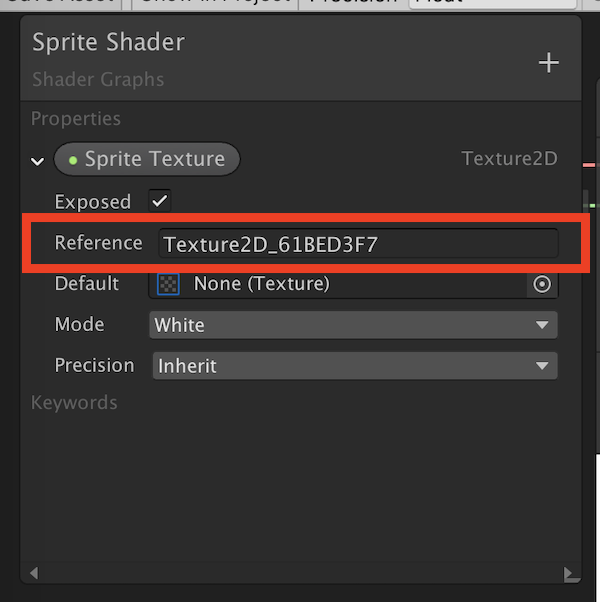
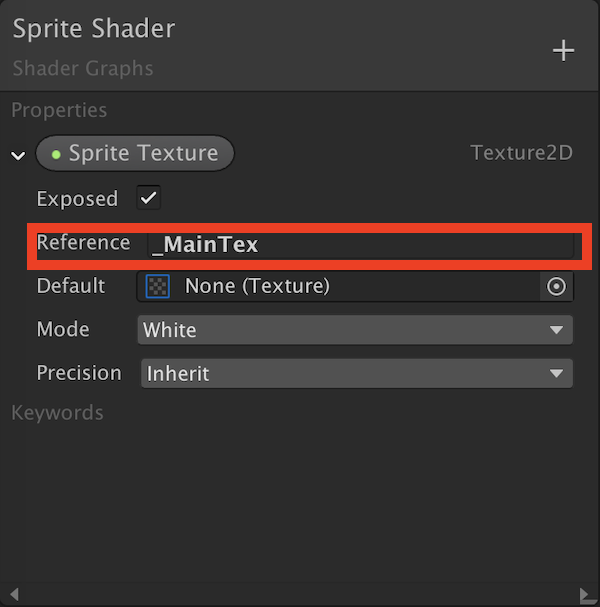
Remember that warning on the Sprite Renderer where it was saying that the _MainTex property was missing? This is where it’s looking to find that property, so go ahead and set the Reference value to _MainTex so we can resolve that warning on the Sprite Renderer.
Now that we have a texture reference with a human readable name and useful reference for code, we’ll soon be able to sample values from it to supply to our output Sprite Lit Master node.
At this point it’s a good time to give a quick overview of how these nodes work. Each node can have a series of inputs and outputs, all of which are of specific types. Think of them as functions in C# where you have a set of inputs and you can return an output (except in this case, you can have multiple outputs). Our Texture 2D Asset doesn’t really take an input because it’s simply a reference to a texture asset from our project, but it does have an output property of type Texture. We want to feed this into the Color property of the Sprite Lit Master node, but that requires a Vector4, so we need to use an intermediary node to extract these values from a Texture.
In order to do this, we’ll create a new node called a Sample Texture 2D which takes a Texture as input and outputs a Vector4 (RBGA channels) as well as four individual Vector1 outputs for each of the RGBA channels. Go ahead and create the Sample Texture 2D by right-clicking and selecting Create Node (or using the space bar hotkey) and then searching for the Sample Texture 2D node.
You can drag your nodes to arrange them roughly like so in your Shader Graph editor:
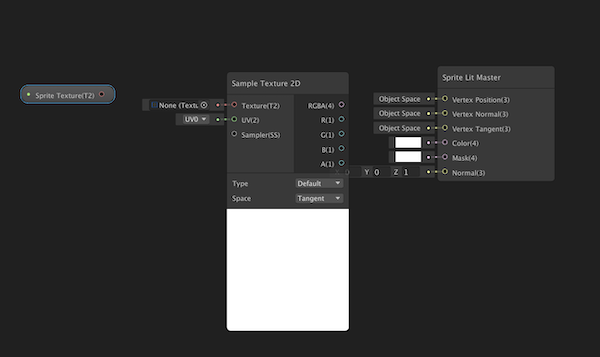
From here it’s simply a matter of dragging and dropping the Texture output of the Texture 2D Asset node into the Texture input of the Sample Texture 2D node, and then dragging and dropping the output Vector4 RGBA value from the Sample Texture 2D node to the Color input of the Sprite Lit Master node.
Click Save Asset in the top left of the Shader Graph editor to compile your shader, and let’s return to our scene.
Supplying the Texture to Render
Open up your material in the inspector and you’ll find a new property there to supply a texture. This is the Texture 2D Asset that we converted to a property in the Shader Graph editor, which made exposed it to the material so that we can supply custom values in the editor or at runtime. This is going to tell the material to use your sprite texture as the Texture 2D Asset property on the shader.
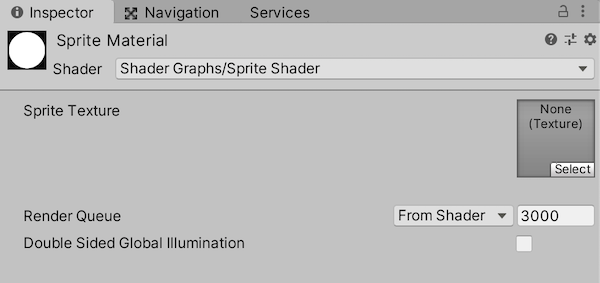
Generally this is where you’d set your custom properties, but we don’t need to select a value here because the Sprite Renderer is going to do that for us. Whatever sprite you’re using on the Sprite Renderer will be supplied automatically to the _MainTex reference on your material, and from there our shader will sample the RGBA values of this texture to supply them to the Color property of the Sprite Lit Master node.
If you run your project now, you should see your sprite rendering correctly.
You should also find that it’s working nicely with your Animator (if you’re running a sprite sheet animation). That’s because each time the Sprite property on the Sprite Renderer changes, it’s updating the _MainTex reference on it’s material. From there our shader takes over and runs with the updated Texture, so it’s always in sync with the Sprite on the Sprite Renderer, without you having to coordinate this yourself.
Next Up
That’s a good bit of groundwork just to get back to the same point as where we were by default using the built-in Sprites - Default material, but don’t worry as this sets us up for for some interesting shaders to come in the following posts. If you haven’t worked with shaders before then hopefully this has shown that Shader Graph can take the edge off and simplify the process of creating custom shaders, while still serving as a good introduction to how shaders actually work.
This shader setup is something we’ll come back to throughout this series, and it’s probably taken you a little while to setup this first time but you’ll quickly be throwing this together in just a few seconds as you get more used to the Shader Graph workflow.
In the next post we’ll be building on this simple shader by recreating the static damage effect from 2015’s Axiom Verge by adding just a few more nodes to the graph, and creating a new reference that we utilize from a small C# script.