


Sprite Shader Effects with Unity and Shader Graph, Part 2: Recreating the Static Damage Effect from Axiom Verge
This post is a continuation of Sprite Shader Effects with Unity and Shader Graph, Part 1 where we started by creating a simple sprite rendering shader in Unity’s Shader Graph. If you’re already familiar with Shader Graph then I don’t expect you’ll need to go through Part 1 to understand what’s going on here. But, if you haven’t used Shader Graph or the new Sprite Lit Graph shader template, or just need a refresher, then please do check out Part 1 and then come back here to carry on.
In this second post of the series, we’ll be extending the bare bones shader created in Part 1 to add an interesting effect that can be controlled at runtime with a small C# script. I thought it would be interesting rather than creating generic effects to instead look at effects found in popular games and try to break them down and recreate them with Shader Graph. For this first post, we’ll be recreating an effect found in Axiom Verge.
If you haven’t heard of it, Axiom Verge is an amazing entry to the metroidvania genre that I totally missed at launch back in 2015, and just recently picked up. If you haven’t already, and you’re a fan of the classic Metroid games or the metroidvania genre as a whole, I’d certainly recommend checking it out. I loved this game and couldn’t get enough of it, to the point that it inspired me to go back and replay the original Metroid on NES (well, on the Switch emulator anyways).
The game features classic retro graphics and audio (the soundtrack is particularly well done in my opinion), but with some interesting modern effects to really make it shine. There are a few effects in this game that were candidates for this first post, and I may return to some of the others in follow up posts, but for this one we’ll be recreating the static flashing effect seen when damaging a monster. Take a look at this video to see what I’m referring to:
Breaking Down the Effect
If you look closely at the drone flying above the main characters head, when it’s hit by a bullet the whole sprite turns to a sort of static effect momentarily to signal that it’s been hurt, before fading back to the normally colored sprite. This effect is used in all monsters in the game, including the massive bosses, and so we know it’s not being done using hand-made sprites as that would be far too laborious to produce for a solo developer. In all likelihood the developer is using a shader to create the effect at runtime.
The key characteristics here are a sprite animation (in fact it looks to be made up of several smaller independent sprites, such that the body, arms and tail can all move independent of one another) which changes it’s rendering instantly from fully colored to the static effect, holds at fully static for a moment, and eventually fades back to it’s normal colors a moment later.
Here’s the same animation zoomed in and slowed down:
The three phases are quite visible here:
- Normal Rendering or Off - the fully colored, standard sprite
- Max Static Intensity - fully static with no sprite colors coming through
- Decaying Static Intensity - partially static and partially colored, returning towards the Off state
I’ll show how to recreate this effect in Unity using a custom shader in Shader Graph and just a few lines of C# to control the effect at runtime. Before we get into it, here’s a look at the finished effect using a free sprite sheet animation from Kenney (linked below):

As you can see the effect follows the three distinct phases described above, and works with an animated sprite sheet.
Links
- All the code for this series can be found on Github at kylebanks/unity-shader-graph-sprite-effects.
- Part 1 of this series, where we setup the project and created a barebones sprite shader, can be found here.
What You’ll Need
- Sprites: I’ll be using the Toon Characters 1 spritesheet from Kenney, but feel free to use your own sprites.
- Unity: I’m using Unity version 2019.3.15f1, but any recent version of Unity should do the trick.
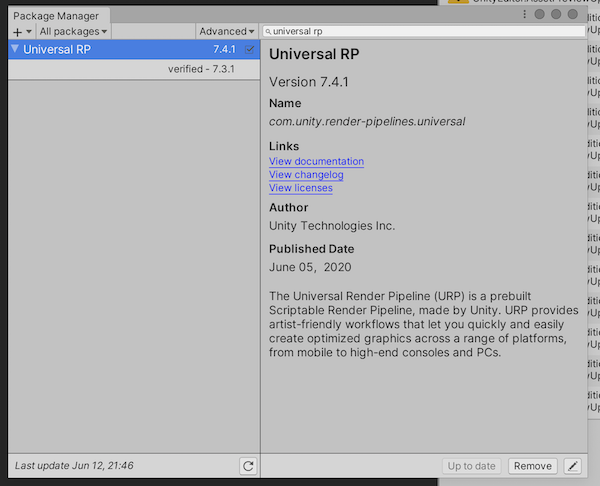
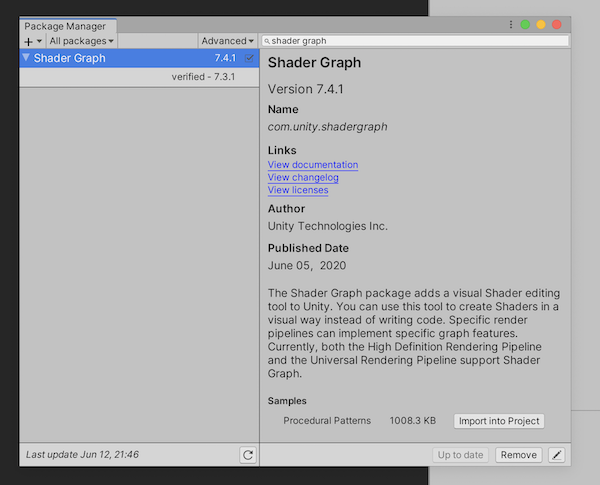
- Universal Render Pipeline and Shader Graph: From the Package Manager window (Window > Package Manager) make sure you have Universal RP (short for Universal Render Pipeline) and Shader Graph installed. I’m using versions 7.4.1 of each, the latest at the time of writing.
Project and Scene Setup
We’re just going to be using a default Unity scene with the default Camera and Directional Light. The only change I’ve made, which is optional, is to change the Camera background to a solid color rather than a skybox, just to help keep the focus on the sprite. This is optional though, feel free to work with your existing scene, camera and lighting.
Besides that, you’ll need to make sure your project is setup to use the Universal Rendering Pipeline. See the Project Setup section in Part 1 if you’re not sure how to do that. Again, we’re just using a default render pipeline asset with no customization.
Rendering a Static Noise Effect with Shader Graph
The first thing we’ll want to do is figure out how to render that static noise effect to a surface. Only once we have that down can we attempt to blend it with our sprite.
Let’s create a new Sprite Lit Graph shader by right-clicking in the project pane and selecting Create > Shader > 2D Renderer > Sprite Lit Graph (Experimental), and then give it a name - I’ll name it Static Effect Shader. We’ll also create a new Material from this shader and assign it to the Sprite Renderer component in our scene.
If you’ve got it all hooked up and kept the default settings then you should see this ugly white mess:
Let’s open up Shader Graph and start adding the static effect.
The first thing we’ll want to do is to create a Simple Noise node, which simply generates a random gray-scale value for each section of the input UV. We’re not actually inputting any UV value, but you can see the effect in the preview window. You can adjust the scale input property to adjust the noise size - I’ll use a value of 1000 as I think that gives a good effect for the sprite I’m using and roughly matches the look from Axiom Verge, but feel free to experiment and use whatever value here that you prefer.
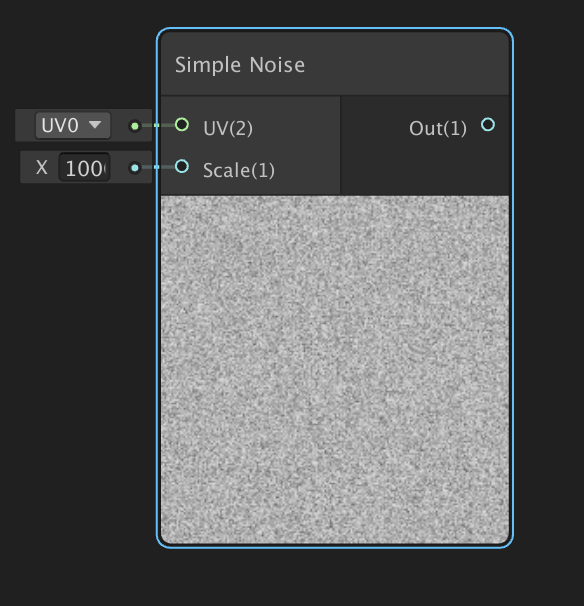
(Note that Shader Graph is cutting it off a little, but it’s 1000 and not 100 here.)
If you connect the output Vector1 of your Simple Noise node to the input Color value of the Sprite Lit Master, save asset and run your game then you’ll see something like so:
Alright we’re on the right track, but there are a few problems here including one that’s not actually noticeable:
- The shape of our sprite isn’t coming through, because we haven’t created the _MainTex property required by the Sprite Renderer
- We have no control over the static, it’s constant and at full intensity. We’ll want to be able to control this in order to enable it only as necessary, so we’ll add support for this shortly.
- Finally, while the static appears to be changing, in reality that’s only because the underlying sprite is changing. If you disable the animator, you’ll see that the static is motionless and essentially the same sprite will always give the same static. This might not be a problem for your usecase, but if you ran this effect on a single sprite (such as an environmental object or other elements in your game that use a single sprite) then your static won’t appear to move which diminishes the effect. We’ll add some randomization to increase the variety of this effect.
We’ll fix up problem (3) first by adding randomization before returning to (1) by combining the effect with our sprite and finally to (2) where we’ll control it via script at the end.
Randomizing the Static Pattern
First, let’s add some randomization to the static. We’ll create a few new nodes in our graph for this, starting with a Tiling and Offset node which is commonly used for randomizing these kinds of patterns over time (as mentioned in the documentation). The output of this node is a Vector2 which we’ll feed into the input UV of our Simple Noise. The Simple Noise generator works such that it generates a static noise pattern for any given UV, so by changing the UV we change the output noise.
The Tiling and Offset node on it’s own is still generating a static UV though so our noise still remains motionless. There are a number of ways to fix this but what we’re going to do is generate a random Offset on the Tiling and Offset node based on time. We’re going to introduce three more straightforward nodes for this: a Time node, a Random Range node, and a Vector2 node. Your graph should look like so:
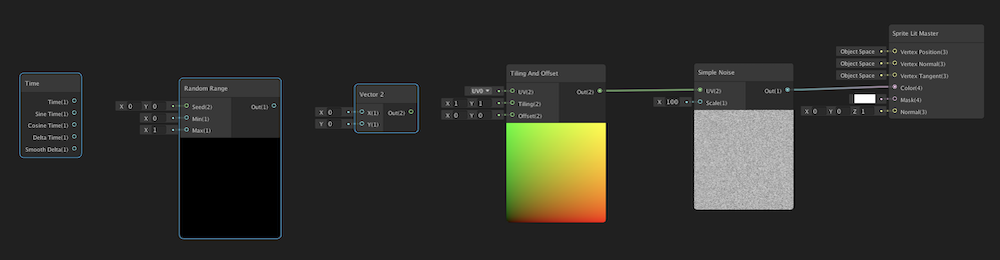
Feed the output of the output Time value of the Time node, this being the current time as opposed to a delta time since last frame you probably use more commonly in game development, and feed that into the Seed input of the Random Range node. This is going to use the current time as a seed to randomly select a float between 0.0 and 1.0 (by default, this can be changed with the Min and Max input properties) thus ensuring that the random value is constantly changing as time passes. Next, we’re going to fork the output of the Random Range node, a Vector1, into a Vector2 by connecting it twice to the Vector2 node - once as the X input and once as the Y input. Finally, the output of the Vector2 node feeds into the input Offset parameter of the Tiling and Offset node, and you should see the effect come to life as the Simple Noise output is now changing at random.
Now we can be sure that even if we run this effect on a single sprite, the static effect is still going to be randomizing each frame.
Combining the Static Effect with the Sprite
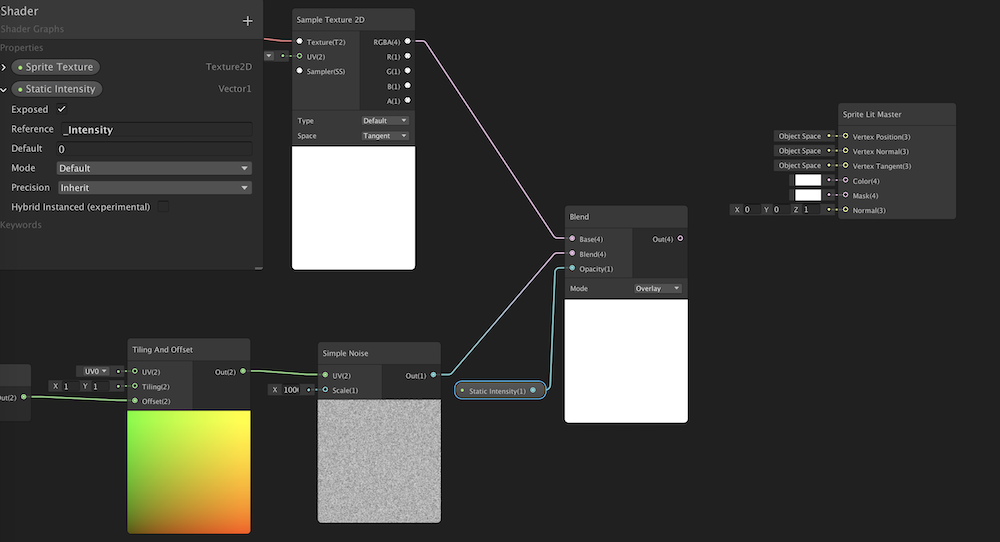
Now that we have the static effect we’re going for, the next step is to blend it with our sprite. The first thing we’ll need to do is setup our Texture 2D Asset and Sample Texture 2D nodes, convert the Texture 2D Asset to a property with _MainTex reference name, and hook them up just as we did in Part 1.
The setup should look like so, with the Texture 2D Asset feeding into the Sample Texture 2D at the top of the graph:
Now obviously we have the Simple Noise output going into the Color parameter of our Sprite Lit Master node, so we can’t send the RGBA output of our Sample Texture 2D directly into the Color. Instead, we’re going to need to do something to blend the sprite texture with the noise… a Blend node should do to the trick!
The Blend node does exactly what it sounds like, it blends one vector with another. It also has a helpful Opacity parameter which will allow us to control the intensity of the effect. We’ll set this up such that an Opacity of zero means only the sprite is visible, an Opacity of one means only the static is visible, and anywhere between zero and one gives us the blended value of the two.
Start by creating a Blend node and feeding the output RGBA of our Sample Texture 2D node into the the Base input of the Blend node, and the output Vector1 of the Simple Noise into the Blend input of the Blend node.
Next, create a new Vector1 node and convert it to a property with the Reference value set to _Intensity, and feed this into the Opacity input of the Blend node. This property is going to allow us to adjust the intensity of the static effect at runtime.
Now you might be thinking that since the Blend node has an output type of Vector4 that we’ll be able to feed that directly into the Color parameter of the Sprite Lit Master, and while that won’t break anything it unfortunately won’t give us the effect we’re looking for. The reason is that the Blend node is also blending the alpha (transparency) value of our sprite the with the alpha value of our noise, which isn’t quite right. Instead we want to keep the alpha value constant from our sprite and instead only blend the colors - this way we keep the shape of our sprite even when in a fully static mode.
What we’ll do is use a Split node on the output of the Blend node to capture only the RGB values and drop the A (alpha) value, and combine that into a Vector4 node with the A output from our Sample Texture 2D. Finally, this Vector4 will then feed into the Color of our Sprite Lit Master.
Whenever you’re going from an RGBA to Vector4 or RGB to Vector3 you’ll want to connect R to X, G to Y, B to Z and A to W.
Here’s what that looks like all wired up:
Save and compile the shader using the Save Asset button in the top-left, and run your game. By default you’re just going to see your sprite, but try playing with the intensity parameter we added to the material and you should the effect starting to come through:
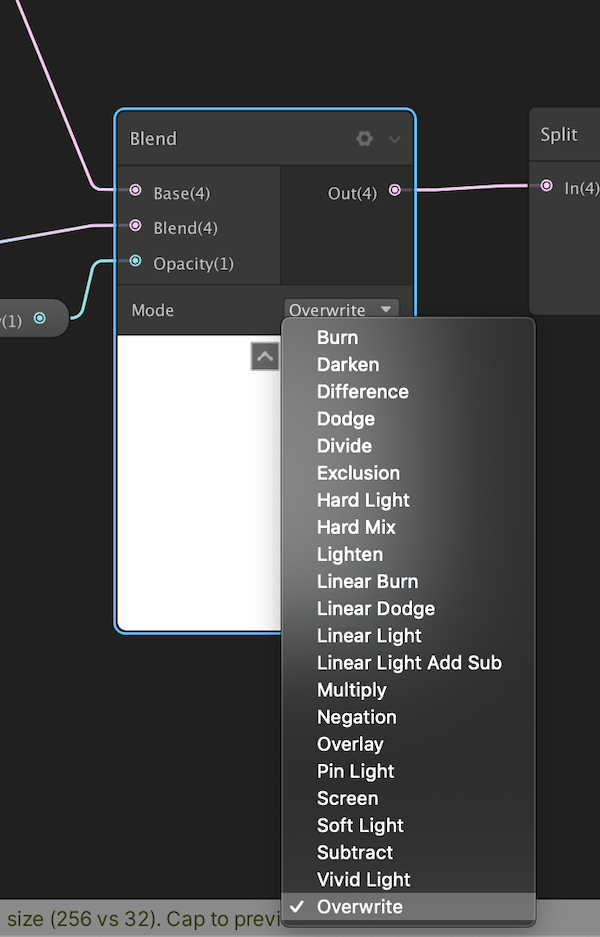
This is pretty cool, but it’s not quite what we’re after. We have the Simple Noise generator and we can see it’s output looks correct, so the issue must be in the Blend step where we combine it with the sprite texture. The issue is that the Blend node has a control parameter called Mode, which by default is set to Overlay. This parameter defines the way that the input vectors are blended, and there are a whole variety of different settings you can play with here, each of which will give interesting different outcomes so please do experiment.
For our effect we want to use the Overwrite mode, so go ahead and change that now.
The documentation for these modes isn’t the greatest but the source code is available to us, so we can better understand what each of them is doing. What Overwrite does is a straightforward lerp between the two vectors based on the Opacity setting (we’ve named this _Intensity):
void Unity_Blend_Overwrite_float4(float4 Base, float4 Blend, float Opacity, out float4 Out)
{
    Out = lerp(Base, Blend, Opacity);
}
I promised Shader Graph meant we wouldn’t be writing shader code, and we’re not, but it’s still helpful to see how this works. If you’re not familiar with the concept of a lerp I’d recommend diving into it as it’s tremendously useful function for game developers, particularly for animating. Lerp is short for linear interpolation and basically all it does is return a value between A and B (or Base and Blend in this case) using an interpolation value T (Opacity here) such that when T = 0 then A is returned, when T = 1 then B is returned, and when T = 0.5 then the mean of A and B is returned. T is clamped to a range of 0..1 so if you pass a value less than zero or greater than one, it’s equivalent to passing zero or one respectively.
For us this means that when the _Intensity parameter we created is set to 1 then the Simple Noise static effect will be returned, and when _Intensity is set to 0 then the sprite texture will be returned, and anywhere between will give us the blended result.
Save your shader with Overwrite set and try it out:
Awesome, that’s exactly the look we’re going for!
Note that there is one strange outcome though in that you can use values less than zero and greater than one and you start to get some peculiar results. Based on the documentation and source code provided by Unity I’m not really sure why this happens as it shouldn’t with the code they’ve provided. We could solve for this by adding a Clamp node between our _Intensity parameter and the Blend node in order to force the value to remain between zero and one, but it’s up to you if you want to bother with that.
From here it’s up to you to play with the Scale input of the Simple Noise to get the effect looking just right for your game. Try making a property to expose that functionality so you can tweak it in the editor and potentially even at runtime. You could also try to blend in some colors so the static isn’t just black and white, it’s all up to you how you want the effect to work in your project.
For now though we’re going to stick with this effect as it resembles what we’re going for from Axiom Verge, and implement a quick script to trigger the static effect whenever a particular event occurs.
Controlling the Intensity via a Script
In Axiom Verge the static effect is displayed whenever a monster gets hurt, but in your game it might be during a cutscene, or when a player jumps, or whenever suits, really. For this demo we’ll trigger the effect whenever you press the space bar, hold at max intensity for a moment, and then let the static slowly dissipate until we’re back to the normal sprite.
I’m going to assume that you don’t have a coding background here, so the script will be written in a way that aims to make it as easy to follow as possible. There are more succinct ways to do this but that’s not the goal here, so if you do come from a developer background then of course feel free to make adjustments where you like.
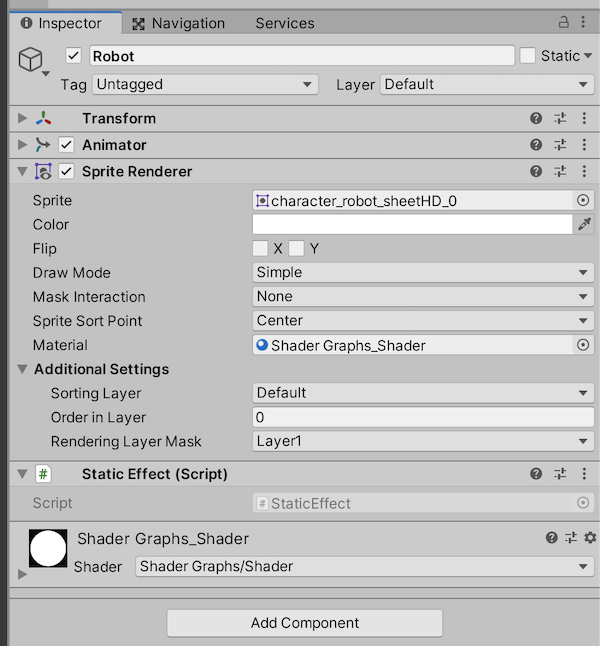
Let’s get to it. Start by creating a new C# script and attaching it to your game object with the Sprite Renderer. I’ll call this script StaticEffect.cs.
The first thing we’ll do is define a few variables to control the duration of the effect phases - remember we have three distinct phases in the effect:
- Normal Rendering or Off - the fully colored, standard sprite
- Max Static Intensity - fully static with no sprite colors coming through
- Decaying Static Intensity - partially static and partially colored, returning towards the Normal Rendering state
The default phase will be the normal rendering phase, where we’re just seeing the standard sprite. Until some event happens, in this case the user pressing the space bar or in Axiom Verge when the monster is damaged, we’ll remain in this state for an indeterminate amount of time. The other two phases will be time limited, so we’ll want to have variables to control how long those phases should last so that we can tune them from the editor, and we’ll want two more variables to track how long we’ve actually been in those phases.
We’ll also need two additional variables: one static string which represents the Reference value we gave our intensity variable in the shader, _Intensity, and one Material to represent the instance of the material that we’re controlling:
public class StaticEffect : MonoBehaviour
{

    private static string MATERIAL_INTENSITY_PARAM = "_Intensity";

    public float MaxIntensityDuration = 2f;
    public float IntensityDecayDuration = 0.5f;

    private float _maxIntensityElapsed;
    private float _intensityDecayElapsed;

    private Material _material;
}
MaxIntensityDuration will determine how long we stay at full intensity after triggering the effect, and IntensityDecayDuration will determine how long it takes to transition back to normal rendering after the max intensity phase. These are public so we can tune them from the editor, but I’ve given them default values of two seconds and half of a second, respectively. The _maxIntensityElapsed and _intensityDecayElapsed variables will track how long we’ve been in those phases so we can adjust the intensity as the animation progresses.
Next we’ll need to get a reference to our Material to assign to the _material variable, which we’ll do by using GetComponent to find our Sprite Renderer and retrieving the material from it. We can do this in the Awake function:
void Awake()
{
    this._material = this.GetComponent<SpriteRenderer>().material;
}

void OnDestroy()
{
    // Clean up our material reference
    Destroy(this._material);
}
A quick note here: any time you get a material reference from a Renderer class using the .material property it’s going to create a new instance of the Material, so you’re responsible for cleaning it up when you’re done with it. We’ll do that in the OnDestroy function. There is also a .sharedMaterial property where we wouldn’t have to clean up, but this material is shared so any modifications we make to it, such as changing the _Intensity, are going to be reflected in all renderers that use that material.
Currently we have a scene with a single Sprite Renderer, but consider a game like Axiom Verge where there are many monsters in the scene all with Sprite Renderers using the same material; when one of them is damaged, only that single monster should display the static effect, not all of them. Using .sharedMaterial would mean all the monsters turn to static when one of them is hurt, and .material means each of them can be independently controlled. It’s up to you and your needs which is the correct approach, just know that .material will create a new Material unique to that renderer and so you’re responsible for cleaning up when you’re done with it.
Alright, now that we have a Material to work with let’s jump into the actual logic of the script. In our Update function we’re going to check if the space bar has been pressed and start the animation. From there, we’re doing to use Time.deltaTime and our “elapsed” variables to track the animation progress and adjust the intensity each frame:
void Update()
{
    // Restart the effect
    if (Input.GetKeyDown(KeyCode.Space))
    {
        this._maxIntensityElapsed = 0f;
        this._intensityDecayElapsed = 0f;
    }

    // Calculate the intensity based on the phase of the animation
    float intensity;

    // Max Static Intensity phase
    if (this._maxIntensityElapsed < MaxIntensityDuration)
    {
        this._maxIntensityElapsed += Time.deltaTime;
        intensity = 1f;
    }
    // Decay phase
    else if (this._intensityDecayElapsed < IntensityDecayDuration)
    {
        this._intensityDecayElapsed += Time.deltaTime;
        intensity = Mathf.Lerp(1f, 0f, this._intensityDecayElapsed / IntensityDecayDuration);
    }
    // Normal Rendering, or Off phase
    else
    {
        intensity = 0f;
    }

    this._material.SetFloat(MATERIAL_INTENSITY_PARAM, intensity);
}
First we check for the space bar and if it’s been pressed this frame then we set the “elapsed” variables each to 0f, indicating that we’ve just started the static effect and no time has passed.
Next we determine what the intensity of the effect should be based on which phase we’re in, and increase the appropriate “elapsed” variable accordingly. If we’re in the max intensity phase then we stick to an intensity of 1f, or full intensity, meaning we’ll only see the static and no sprite. Similarly in the normal rendering or off phase we stick to an intensity of 0f, or no intensity, meaning we’ll only see the sprite and no static.
In the decay phase, we use the Mathf.Lerp function, described above when we were looking at the Blend node Overwrite implementation, to determine a value between 1f and 0f to use for the intensity. This is going to be based on the amount of time elapsed in the decay phase as a percentage of the total decay duration.
Let’s say you have a framerate of 60 frames per second and the decay phase lasts for half a second. We’ll get 30 Update calls during that half second and so we’ll adjust the _Intensity 30 times, each stepping further from 1f and closer to 0f until we finally reach 0f at the end. Here’s what that looks line frame by frame:
| Frame | Time.deltaTime | _intensityDecayElapsed | _intensityDecayElapsed as pct. of IntensityDecayDuration | Intensity |
|---|---|---|---|---|
| 1 | 0.0167 | 0.0167 | 3.34% | .97 |
| 2 | 0.0167 | 0.0334 | 6.68% | .94 |
| 3 | 0.0167 | 0.0501 | 10.02% | .90 |
| … | … | … | … | … |
| 29 | 0.0167 | 0.4843 | 96.86% | .03 |
| 30 | 0.0167 | 0.5 | 100% | 0 |
What’s important here is that the intensity is moving further from 1f and closer to 0f each frame, so we get a smooth transition from the full static effect back to the normal sprite rendering.
Right now we have a working script but if you run your game you’ll find that the sprite is starting in the max intensity phase right away, which we don’t want. That’s because each of the “elapsed” variables is set to 0f by default, so we’ll fix that in the Start function by setting them equal to their respective max duration:
void Start()
{
    this._maxIntensityElapsed = MaxIntensityDuration;
    this._intensityDecayElapsed = IntensityDecayDuration;
}
This is essentially just skipping to the end of the animations so we’re back in the normal rendering phase right from the start.
And that’s all there is to it, if you run your game now and press the space bar you’ll see the sprite turn to max intensity for a couple of seconds, and then transition smoothly back to normal rendering:

Finally, here’s the link to the full script and project on Github in case you’ve had any trouble following along.
Conclusion
That’s it! You now know how to create a static effect on your sprites, and control this at runtime with C#. Hopefully if you weren’t familiar with Shader Graph before then this has been a good introduction for you.
Let me know down below or on Twitter @kylewbanks if you make any interesting adjustments to the effect, and if you use this in a game I’d love to hear about it. I’ll be doing some more of these tutorials in the future, so send me any requests if there’s an effect you’d like to see done!