


OpenGL & Go Tutorial Part 2: Drawing the Game Board
Part 1: Hello, OpenGL | Part 2: Drawing the Game Board | Part 3: Implementing the Game
The full source code of the tutorial is available on GitHub.
Welcome back to the OpenGL & Go Tutorial! If you haven’t gone through Part 1 you’ll definitely want to take a step back and check it out.
At this point you should be the proud creator of a magnificent white triangle, but we’re not in the business of using triangles as our game unit so it’s time to turn the triangle into a square, and then we’ll make an entire grid of them.
Let’s get started!
Make a Square out of Triangles
Before we can make a square, let’s turn our triangle into a right-angle. Open up main.go and change the triangle definition to look like so:
triangle = []float32{
    -0.5, 0.5, 0,
    -0.5, -0.5, 0,
    0.5, -0.5, 0,
}
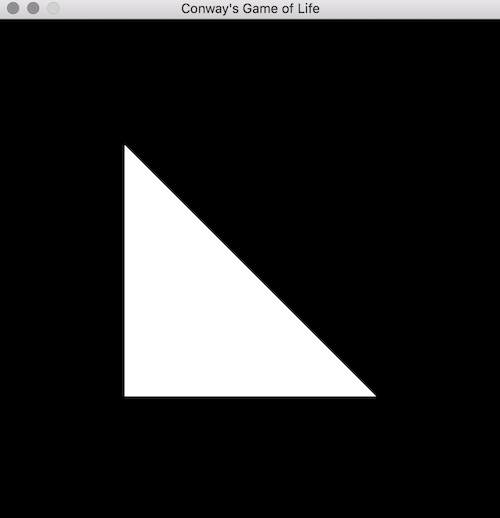
What we’ve done is move the X-coordinate of the top vertex to the left (-0.5), giving us a triangle like so:
Easy enough, right? Now let’s make a square out of two of these. Let’s rename triangle to square and add a second, inverted right-angle triangle to the slice:
square = []float32{
    -0.5, 0.5, 0,
    -0.5, -0.5, 0,
    0.5, -0.5, 0,

    -0.5, 0.5, 0,
    0.5, 0.5, 0,
    0.5, -0.5, 0,
}
Note: You’ll also need to rename the two references to triangle to be square, namely in main and draw.
Here we’ve doubled the number of points by adding a second set of three vertices to be our upper top-right triangle to complete the square. Run it for glory:
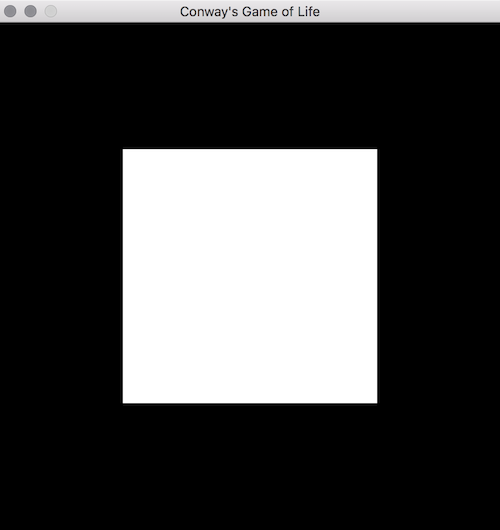
Great, now we have the ability to draw a square! OpenGL isn’t so tough after all, is it?
Draw a Grid of Squares covering the Window
Now that we can draw one square, how about 100 of them? Let’s create a cell struct to represent each unit of our grid so that we can be flexible in the number of squares we draw:
type cell struct {
    drawable uint32

    x int
    y int
}
The cell contains a drawable which is a square Vertex Array Object just like the one we created above, and an X and Y coordinate to dictate where on the grid this cell resides.
We’re also going to want two more constants that define the size and shape of our grid:
const (
    ...

    rows = 10
    columns = 10
)
Now let’s add a function to create the grid:
func makeCells() [][]*cell {
    cells := make([][]*cell, rows, rows)
    for x := 0; x < rows; x++ {
        for y := 0; y < columns; y++ {
            c := newCell(x, y)
            cells[x] = append(cells[x], c)
        }
    }

    return cells
}
Here we create a multi-dimensional slice to represent our game’s board, and populate each element of the matrix with a cell using a new function called newCell which we’ll write in just a moment.
Before moving on, let’s take a moment to visualize what makeCells is creating. We’re creating a slice that is equal in length to the number of rows on the grid, and each of these slices contains a slice of cells, equal in length to the number of columns. If we were to define rows and columns each equal to two, we’d create the following matrix:
[
    [cell, cell],
    [cell, cell]
]
We’re creating a much larger matrix that’s 10x10 cells:
[
    [cell, cell, cell, cell, cell, cell, cell, cell, cell, cell],
    [cell, cell, cell, cell, cell, cell, cell, cell, cell, cell],
    [cell, cell, cell, cell, cell, cell, cell, cell, cell, cell],
    [cell, cell, cell, cell, cell, cell, cell, cell, cell, cell],
    [cell, cell, cell, cell, cell, cell, cell, cell, cell, cell],
    [cell, cell, cell, cell, cell, cell, cell, cell, cell, cell],
    [cell, cell, cell, cell, cell, cell, cell, cell, cell, cell],
    [cell, cell, cell, cell, cell, cell, cell, cell, cell, cell],
    [cell, cell, cell, cell, cell, cell, cell, cell, cell, cell],
    [cell, cell, cell, cell, cell, cell, cell, cell, cell, cell]
]
Now that the we understand the shape and representation of the matrix we’re creating, let’s have a look at newCell which we use to actually populate the matrix:
func newCell(x, y int) *cell {
    points := make([]float32, len(square), len(square))
    copy(points, square)

    for i := 0; i < len(points); i++ {
        var position float32
        var size float32
        switch i % 3 {
        case 0:
                size = 1.0 / float32(columns)
                position = float32(x) * size
        case 1:
                size = 1.0 / float32(rows)
                position = float32(y) * size
        default:
                continue
        }

        if points[i] < 0 {
                points[i] = (position * 2) - 1
        } else {
                points[i] = ((position + size) * 2) - 1
        }
    }

    return &cell{
        drawable: makeVao(points),

        x: x,
        y: y,
    }
}
There’s quite a lot going on in this function so let’s break it down. The first thing we do is create a copy of our square definition. This allows us to change its contents to customize the current cell’s position, without impacting any other cells that are also using the square slice. Next we iterate over the points copy and act based on the current index. We use a modulo operation to determine if we’re at an X (i % 3 == 0) or Y (i % 3 == 1) coordinate of the shape (skipping Z since we’re operating in two dimensions) and determine the size (as a percentage of the entire game board) of the cell accordingly, as well as it’s position based on the X and Y coordinate of the cell on the game board.
Next, we modify the points which currently contain a combination of 0.5, 0 and -0.5 as we defined them in the square slice. If the point is less than zero, we set it equal to the position times 2 (because OpenGL coordinates have a range of 2, between -1 and 1), minus 1 to normalize to OpenGL coordinates. If the position is greater than or equal to zero, we do the same thing but add the size we calculated.
The purpose of this is to set the scale of each cell so that it fills only its percentage of the game board. Since we have 10 rows and 10 columns, each cell will be given 10% of the width and 10% of the height of the game board.
Finally, after all the points have been scaled and positioned, we create a cell with the X and Y coordinate provided, and set the drawable field equal to a Vertex Array Object created from the points slice we just manipulated.
Alright, now in main we can remove our call to makeVao and replace it with a call to makeCells. We’ll also change draw to take the matrix of cells instead of a single vao:
func main() {
    ...

    // vao := makeVao(square)
    cells := makeCells()

    for !window.ShouldClose() {
        draw(cells, window, program)
    }
}

func draw(cells [][]*cell, window *glfw.Window, program uint32) {
    gl.Clear(gl.COLOR_BUFFER_BIT | gl.DEPTH_BUFFER_BIT)
    gl.UseProgram(program)

    // TODO

    glfw.PollEvents()
    window.SwapBuffers()
}
Now we’ll need each cell to know how to draw itself. Let’s add a draw function to the cell:
func (c *cell) draw() {
    gl.BindVertexArray(c.drawable)
    gl.DrawArrays(gl.TRIANGLES, 0, int32(len(square) / 3))
}
This should look familiar, its nearly identical to how we were drawing the square vao in draw previously, the only difference being we BindVertexArray using c.drawable, which is the cell’s vao we created in newCell.
Back in the main draw function, we can loop over each cell and have it draw itself:
func draw(cells [][]*cell, window *glfw.Window, program uint32) {
    gl.Clear(gl.COLOR_BUFFER_BIT | gl.DEPTH_BUFFER_BIT)
    gl.UseProgram(program)

    for x := range cells {
        for _, c := range cells[x] {
            c.draw()
        }
    }

    glfw.PollEvents()
    window.SwapBuffers()
}
As you can see we loop over each of the cells and call its draw function. If you run the application you should see the following:
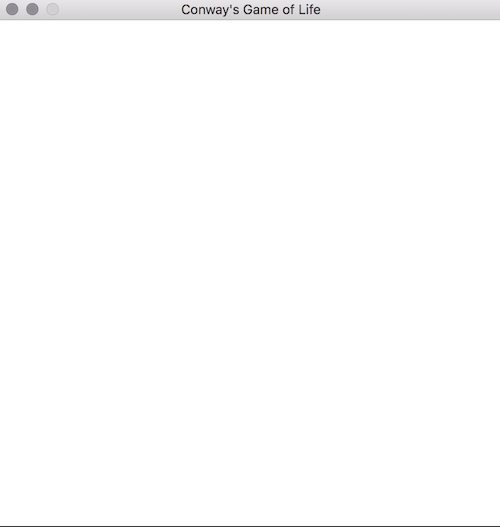
Is this what you expected? What we’ve done is create a square for each row and column on the grid, and colored it in, effectively filling the entire game board!
We can see an visualize individual cells by commenting out the for-loop for a moment and doing the following:
// for x := range cells {
//     for _, c := range cells[x] {
//         c.draw()
//     }
// }

cells[2][3].draw()
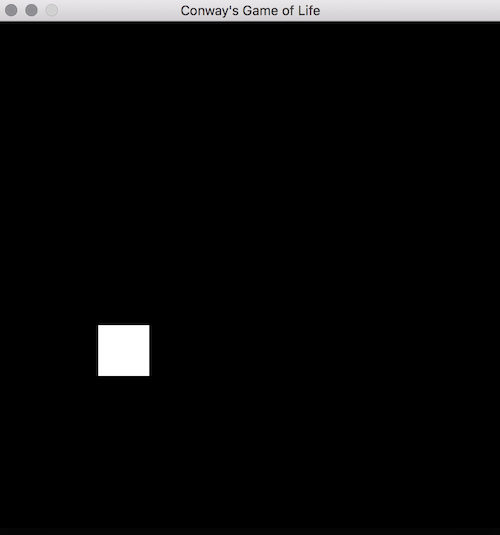
This draws only the cell located at coordinate (X=2, Y=3). As you can see, each individual cell takes up a small portion of the game board, and is responsible for drawing its own space. We can also see that our game board has its origin, that is the (X=0, Y=0) coordinate, in the bottom-left corner of the window. This is simply a result of the way our newCell function calculates the position, and could be made to use the top-right, bottom-right, top-left, center, or any other position as its origin.
Let’s go ahead and remove the cells[2][3].draw() line and uncomment the for-loop, leaving us with the fully drawn grid we had above.
Summary
Alright - we can now use two triangles to draw a square, and we have ourselves a game board! We should be proud, we’ve covered a lot of ground up to this point and to be completely honest, the hardest part is behind us now!
Next up in Part 3 we’ll implement the core game logic and see some cool simulations!
Part 1: Hello, OpenGL | Part 2: Drawing the Game Board | Part 3: Implementing the Game
The full source code of the tutorial is available on GitHub.
Checkpoint
Here’s the contents of main.go at this point of the tutorial:
package main

import (
	"fmt"
	"log"
	"runtime"
	"strings"

	"github.com/go-gl/gl/v4.1-core/gl" // OR: github.com/go-gl/gl/v2.1/gl
	"github.com/go-gl/glfw/v3.2/glfw"
)

const (
	width  = 500
	height = 500

	vertexShaderSource = `
		#version 410
		in vec3 vp;
		void main() {
			gl_Position = vec4(vp, 1.0);
		}
	` + "\x00"

	fragmentShaderSource = `
		#version 410
		out vec4 frag_colour;
		void main() {
			frag_colour = vec4(1, 1, 1, 1.0);
		}
	` + "\x00"

	rows    = 10
	columns = 10
)

var (
	square = []float32{
		-0.5, 0.5, 0,
		-0.5, -0.5, 0,
		0.5, -0.5, 0,

		-0.5, 0.5, 0,
		0.5, 0.5, 0,
		0.5, -0.5, 0,
	}
)

type cell struct {
	drawable uint32

	x int
	y int
}

func main() {
	runtime.LockOSThread()

	window := initGlfw()
	defer glfw.Terminate()
	program := initOpenGL()

	cells := makeCells()
	for !window.ShouldClose() {
		draw(cells, window, program)
	}
}

func draw(cells [][]*cell, window *glfw.Window, program uint32) {
	gl.Clear(gl.COLOR_BUFFER_BIT | gl.DEPTH_BUFFER_BIT)
	gl.UseProgram(program)

	for x := range cells {
		for _, c := range cells[x] {
			c.draw()
		}
	}

	glfw.PollEvents()
	window.SwapBuffers()
}

func makeCells() [][]*cell {
	cells := make([][]*cell, rows, rows)
	for x := 0; x < rows; x++ {
		for y := 0; y < columns; y++ {
			c := newCell(x, y)
			cells[x] = append(cells[x], c)
		}
	}

	return cells
}

func newCell(x, y int) *cell {
	points := make([]float32, len(square), len(square))
	copy(points, square)

	for i := 0; i < len(points); i++ {
		var position float32
		var size float32
		switch i % 3 {
		case 0:
			size = 1.0 / float32(columns)
			position = float32(x) * size
		case 1:
			size = 1.0 / float32(rows)
			position = float32(y) * size
		default:
			continue
		}

		if points[i] < 0 {
			points[i] = (position * 2) - 1
		} else {
			points[i] = ((position + size) * 2) - 1
		}
	}

	return &cell{
		drawable: makeVao(points),

		x: x,
		y: y,
	}
}

func (c *cell) draw() {
	gl.BindVertexArray(c.drawable)
	gl.DrawArrays(gl.TRIANGLES, 0, int32(len(square)/3))
}

// initGlfw initializes glfw and returns a Window to use.
func initGlfw() *glfw.Window {
	if err := glfw.Init(); err != nil {
		panic(err)
	}
	glfw.WindowHint(glfw.Resizable, glfw.False)
	glfw.WindowHint(glfw.ContextVersionMajor, 4)
	glfw.WindowHint(glfw.ContextVersionMinor, 1)
	glfw.WindowHint(glfw.OpenGLProfile, glfw.OpenGLCoreProfile)
	glfw.WindowHint(glfw.OpenGLForwardCompatible, glfw.True)

	window, err := glfw.CreateWindow(width, height, "Conway's Game of Life", nil, nil)
	if err != nil {
		panic(err)
	}
	window.MakeContextCurrent()

	return window
}

// initOpenGL initializes OpenGL and returns an intiialized program.
func initOpenGL() uint32 {
	if err := gl.Init(); err != nil {
		panic(err)
	}
	version := gl.GoStr(gl.GetString(gl.VERSION))
	log.Println("OpenGL version", version)

	vertexShader, err := compileShader(vertexShaderSource, gl.VERTEX_SHADER)
	if err != nil {
		panic(err)
	}

	fragmentShader, err := compileShader(fragmentShaderSource, gl.FRAGMENT_SHADER)
	if err != nil {
		panic(err)
	}

	prog := gl.CreateProgram()
	gl.AttachShader(prog, vertexShader)
	gl.AttachShader(prog, fragmentShader)
	gl.LinkProgram(prog)
	return prog
}

// makeVao initializes and returns a vertex array from the points provided.
func makeVao(points []float32) uint32 {
	var vbo uint32
	gl.GenBuffers(1, &vbo)
	gl.BindBuffer(gl.ARRAY_BUFFER, vbo)
	gl.BufferData(gl.ARRAY_BUFFER, 4*len(points), gl.Ptr(points), gl.STATIC_DRAW)

	var vao uint32
	gl.GenVertexArrays(1, &vao)
	gl.BindVertexArray(vao)
	gl.EnableVertexAttribArray(0)
	gl.BindBuffer(gl.ARRAY_BUFFER, vbo)
	gl.VertexAttribPointer(0, 3, gl.FLOAT, false, 0, nil)

	return vao
}

func compileShader(source string, shaderType uint32) (uint32, error) {
	shader := gl.CreateShader(shaderType)

	csources, free := gl.Strs(source)
	gl.ShaderSource(shader, 1, csources, nil)
	free()
	gl.CompileShader(shader)

	var status int32
	gl.GetShaderiv(shader, gl.COMPILE_STATUS, &status)
	if status == gl.FALSE {
		var logLength int32
		gl.GetShaderiv(shader, gl.INFO_LOG_LENGTH, &logLength)

		log := strings.Repeat("\x00", int(logLength+1))
		gl.GetShaderInfoLog(shader, logLength, nil, gl.Str(log))

		return 0, fmt.Errorf("failed to compile %v: %v", source, log)
	}

	return shader, nil
}