


Creating Overlap Shader Effects, Such as Underwater and Night Vision, in Unity's Shader Graph
In some of my more recent posts I began a series where I’d recreate effects from popular games using Shader Graph in Unity. The first of these was to create the static effect when a character receives damage in the excellent Axiom Verge. Well just a couple posts in I’ve decided to break from that theme and instead highlight some common effects seen in many games, without focusing on a specific game in particular.
In this post I’ll show you how to create a quick and easy shader using Unity’s Shader Graph) and the Universal Render Pipeline that can be used to achieve an overlap effect.
Highlighting the overlap or intersection of two objects in your scene can be utilized for a number of interesting effects, such as showing a silhouette when a character or object is behind a wall for a night vision feature in a stealth game, or adding an underwater effect when an object is submerged in a water scene.
The shader will support a primary color or texture, an overlap color, and smoothing between the two as the intersecting object moves further away.
Here are the results for objects submerged in water:
And here’s a similar effect used for a night vision or x-ray kind of effect when a character passes behind a plane:
Both of these demos are using the exact same shader and only parameter modifications on the materials in order to achieve the different looks. You can get pretty creative with this shader to achieve all kinds of different effects.
All of the code, including demo scenes, is available on Github at github.com/KyleBanks/overlap-shader.
Prerequisites
I’m going to assume you’ve worked with Shader Graph and the Universal Render Pipeline before, at least enough to be familiar with the core concepts, and you know how to setup the project. If not, don’t worry - check out my tutorial on Shader Graph, including how to get it installed and setup.
For this project I’m using the latest Unity version at the time of writing, 2020.1, although there’s nothing from this version that’s actually required to achieve the effect.
Finally, you’re also going to need some models to work with. I’m using some CC0 assets from @KenneyNL, specifically the pirate kit. If you want to follow along you can download any of the kits from www.kenney.nl or use your own models if you have an existing project you’re working with.
Alright, let’s get started!
Shader Setup
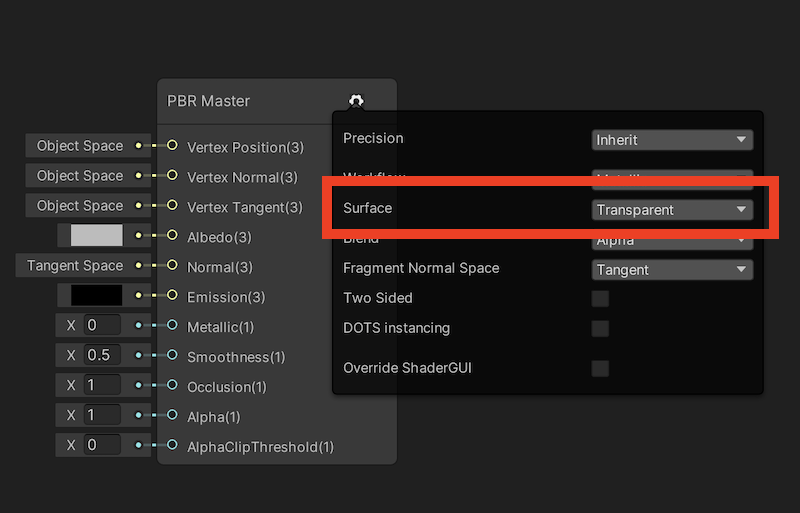
Okay, the first thing we’re going to do is create a new PBR Graph to work with - let’s call it Overlap Shader. Open it up in Shader Graph and set the Surface to Transparent.
Next we’ll create a few parameters to control the look and feel of our object.
- Albedo (Color) - the base color of our material.
- Overlap Color (Color) - the color used for areas where we have an overlapping object.
- Max Overlap (Vector1) - how close an object needs to be to color the overlap. The further away the object, the less Overlap Color will be used.
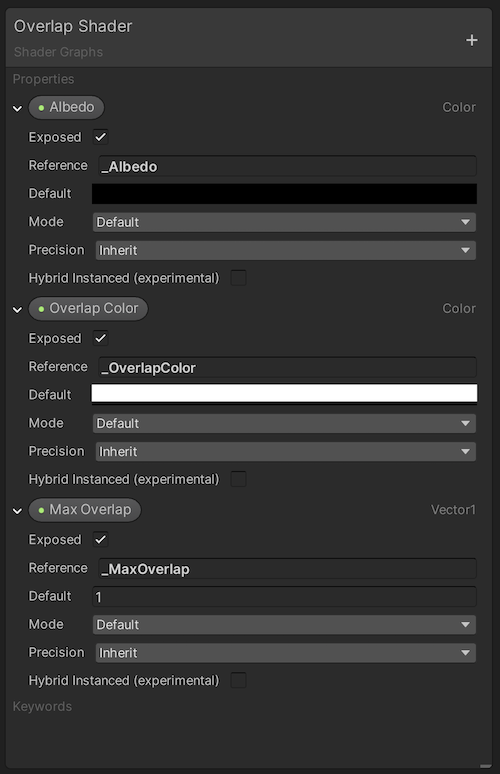
Using the default values above as an example, this shader will color a black object with white highlights wherever there’s an overlapping object within a distance of 1. The color will linearly interpolate from white to black such that objects at a distance of 0 will be completely white while objects at a distance of 0.5 will be gray and at a distance of 1 they’ll be completely black.
Alright, one last bit of setup required before we start writing the shader logic. Depending on which version of the Universal Render Pipeline you’re using you’ll need to enable the Depth Texture setting on your pipeline asset. Earlier versions have this enabled by default, so if you don’t see the setting you should be okay.
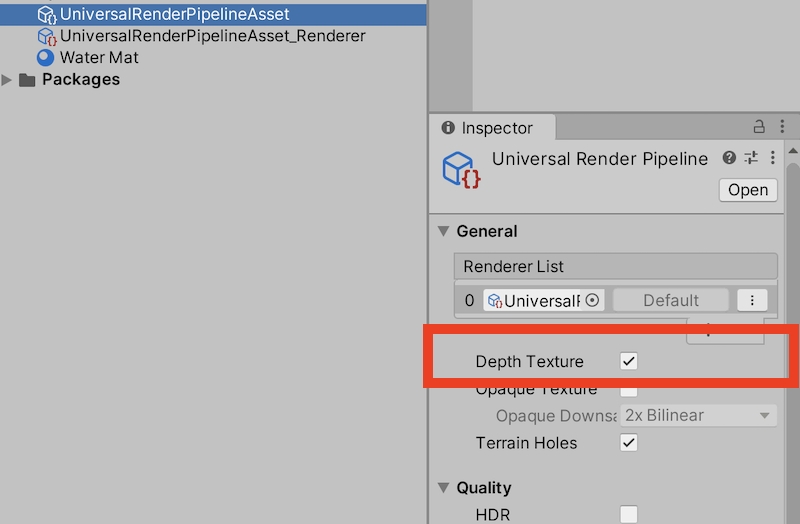
This will allow us to read scene depth information within our shader, which will be needed in order to measure the distance of objects from our material.
Shader Setup
Right, now we’re ready to work out the logic of the shader.
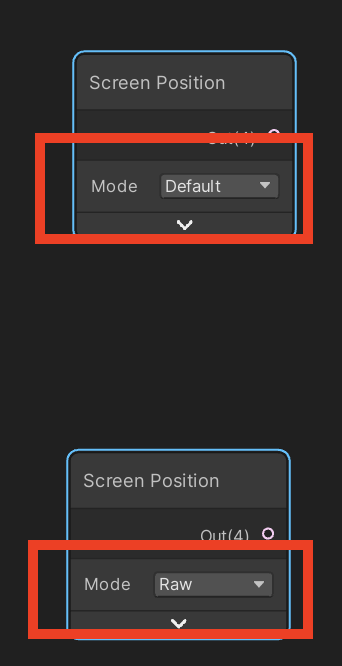
The first thing we’ll need to do is measure the difference between the scene depth and the depth of our object. We’ll break this down into two parts, each using a Screen Position Node which gives us the position on screen of the current fragment. We’ll need two of these nodes, one in Default mode and one in Raw mode. The difference here is the Raw version hasn’t been adjusted for depth yet, so we can get the true depth of our object before modification.
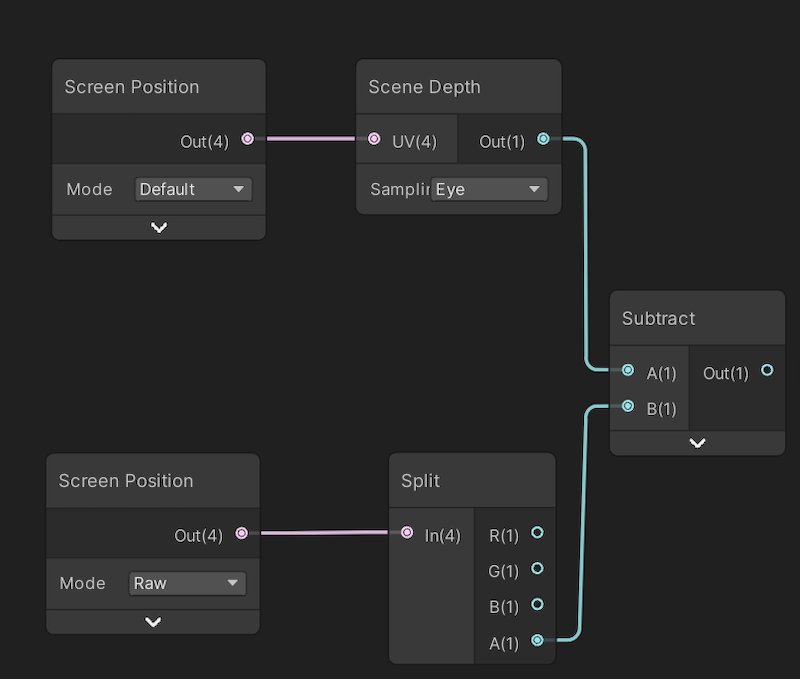
The output of the Default mode Screen Position will be fed into a Scene Depth node which gives us access to the depth buffer at the provided position. This will give us the depth of whatever objects have already been rendered, which will allow us to compare this depth with the depth of the current object. We’ll need to set the Mode of the Scene Depth node to Eye - it took me a while to figure this one out, thanks to Daniel Ilett’s sea foam tutorial for guiding the way on this.
The output of the Raw mode Screen Position can be fed into a Split node so we can grab the A (or more accurately, W) component which represents the raw depth of the current fragment.
Finally we can subtract this from the depth from the Scene Depth node to give us the distance our fragment is from the object currently in the depth buffer.
In very simple terms, we now have the distance (in terms of depth) from the currently rendering object to the last object rendered at the same screen position. With this we know how far the object is, and we can apply the Overlap Color accordingly.
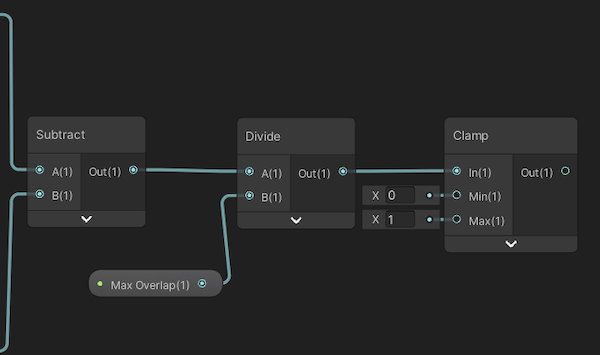
If we take this distance as a percentage of our Max Overlap parameter and use a Clamp node to limit the value to a range of 0..1 then we know whether it’s in or out of our overlap range, and by how much we should apply the Overlap Color.
We now have an “overlap level” measurement, the only issue with this is that it’s logically backwards (to me anyways). Right now an object at the max distance or beyond will have a value of 1 or ‘100% overlap level’ whereas an object at a distance of zero where it’s at the exact same position as our object will have a ‘0% overlap level’. We can work with it either way but to me it’s less sensible so I prefer to flip it around, so that an object at the exact same position will have a value of 1 or ‘100% overlap level’, using a One Minus node which simply subtracts the input from 1, so that 1 becomes 0, and 0 becomes 1.
Finally the output of the One Minus node can be used as the T value of a Lerp node in order to linearly interpolate between the Albedo to the Overlap Color parameters, and the output of this Lerp can be fed to the Albedo of the master node to complete the graph.
This Lerp handles the logic of determining what percentage between each color we use based on the distance of the object that’s currently in the depth buffer at the same position. If the object is at the exact same position and therefor has an overlap level of 1 then it will be drawn using the Overlap Color and as it moves further away it’ll be drawn at a color closer and closer to the value of Albedo, until finally it gets to the Max Overlap distance and beyond where it will have an overlap level of 0 and be drawn using the exact value of Albedo.
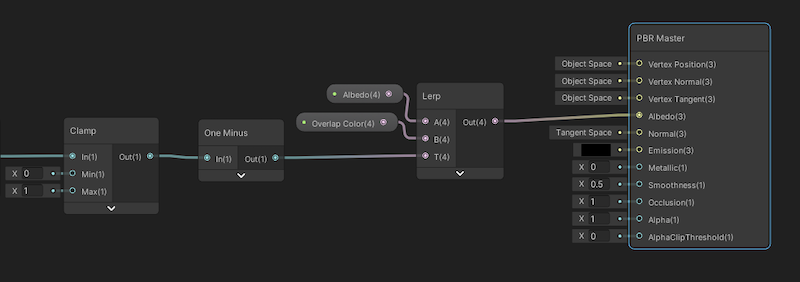
And that’s it! Just in case you had any trouble following along, here’s the full graph (which is also available on Github at github.com/KyleBanks/overlap-shader).

If the One Minus really bothers you then you can remove it and simply feed the output of the Clamp into the T input of the Lerp node, with the A and B parameters flipped so that Overlap Color goes to A and Albedo goes to B.
Make sure to save your shader to compile it, and I’ll show how I created the two demo GIFs at the beginning of the post.
Underwater Effect
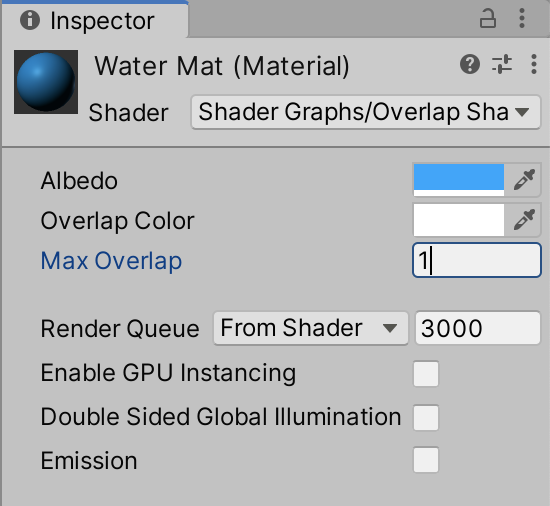
Let’s create a material to use as our water. For this I used a light blue for the Albedo and solid white for the Overlap Color, along with a Max Overlap of 1. Of course you’ll want to play with the values, particularly the Max Distance, in order to achieve an effect that’s right for your game.
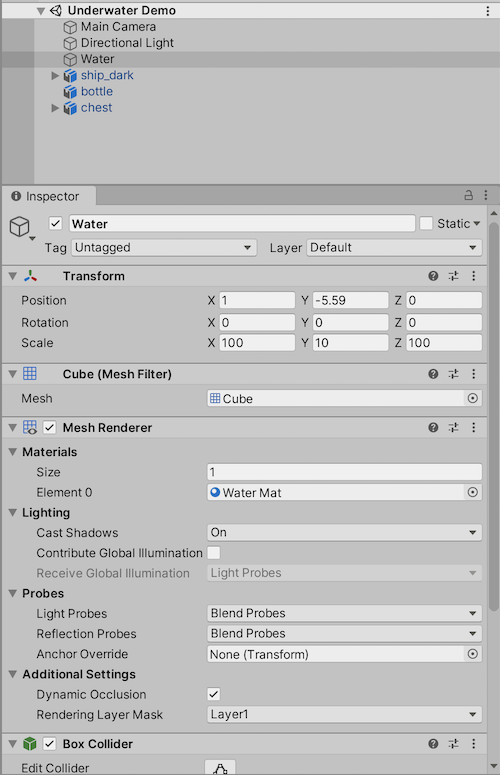
The demo scene is rather straightforward. Using all default settings in the scene I simply added a Cube, assigned the water material to it’s renderer, and scaled it so that it filled the screen horizontally. From there it’s simply a matter of dipping some objects in the water! You can use whatever models and standard materials you like, and you don’t need to change anything about them for the water material to do it’s work.
Run the game and you should see results similar to what I’ve shown here:
Again, this is all available on Github at github.com/KyleBanks/overlap-shader in the Underwater Demo scene.
Night Vision Effect
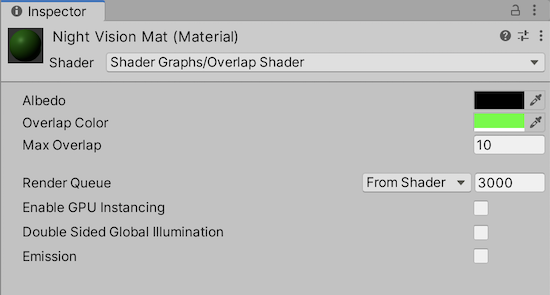
For the night vision effect, create another material with a black Albedo and green Overlap Color. For this one the Max Overlap is really going to depend on the effect you’re looking for, but for me I found a value of 10 gave good results.
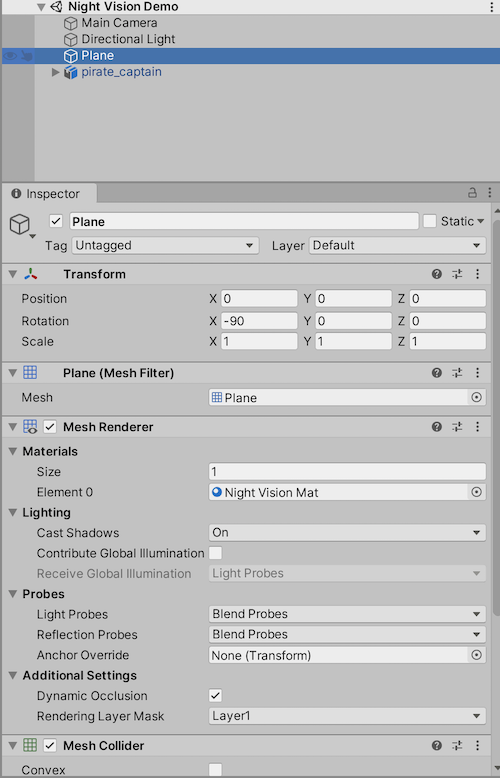
This time the scene consists of a Plane with the night vision material assigned to it, and stood upright so that objects don’t physically overlap the plane but instead pass behind it. With the higher Max Overlap this allows us to limit the range of the night vision while still getting a sense of depth where we can tell how near an object is based on the intensity of the green.
Hit play and you should see results similar to this when an object passes behind the plane:
Wrapping Up
And there you have it, a nice and easy shader to get overlap effects in Unity with Shader Graph and Universal Render Pipeline. Let me know if this has been helpful, or if you’d like to see this expanded on at all, and checkout the repo on Github if you want demo scenes to play around in.
I feel this shader has a lot of room for expansion and there are a number of interesting uses for it. For me it’s best used as a sub-graph in your own shaders so you can simply use it as a node in a larger graph. By using sub-graphs you can really improve organization and reusability by building out a library of using shader steps. Here’s how I use the overlap shader in my current project to add a water overlap effect as one step in a more complex graph.
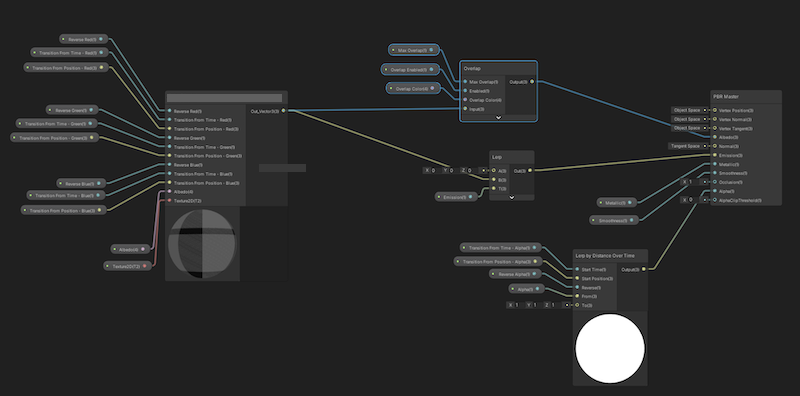
Note the Overlap node in the top center of the above graph, which takes the output of previous nodes as the Albedo and also adds an Enabled parameter so I can disable it in scenarios where it’s not needed.