


Tutorial: Creating a Square Camera (With Preview) on Android
Square photos are all the rage now since Instagram introduced them back in 2010, but implementing them on Android is much more painful than you’d imagine.
The Camera API on Android supports very little native functionality for square photos, limiting you to the resolutions that the camera supports, which varies from device to device. None of the devices I’ve tested support a native 1:1 aspect ratio, so simply resizing the image to a square, or showing the camera preview as a square, will leave you with badly stretched images.
Luckily, square photos are achievable using the following steps:
- Display a fullscreen camera preview with non-transparent overlays to make it look square.
- When the photo is taken, crop the section of the image that matches your square preview.
Unfortunately this requires a lot more work than you’d imagine, so let’s get started:
Square Preview
We want the preview to look as though it’s a square, so that when the user takes a photo it matches the preview. In order to accomplish this, we overlay views on top of the camera preview to make it look square:
<RelativeLayout xmlns:android="http://schemas.android.com/apk/res/android"
                android:orientation="vertical"
                android:layout_width="match_parent"
                android:layout_height="match_parent">

    <!-- Camera Preview -->
    <SurfaceView
        android:id="@+id/camera_preview"
        android:layout_width="match_parent"
        android:layout_height="match_parent"/>
    <!-- /End Camera Preview -->

    <!-- Overlay -->
    <RelativeLayout
        android:id="@+id/overlay"
        android:layout_width="match_parent"
        android:layout_height="wrap_content"
        android:background="@color/white"
        android:layout_alignParentBottom="true">

        <!--- Put your Content Here --->

    </RelativeLayout>
    <!-- /End Overlay -->

</RelativeLayout>
You can see we make the SurfaceView (our camera preview) match the full width and height of the layout, taking up the full screen. We use a RelativeLayout as the parent so we can then create an overlay view, here another RelativeLayout, and align it to the bottom of the parent, on top of the preview. It’s important to now that you can put anything in the overlay, such as a button to take a photo. The content doesn’t matter, it just matters that it takes up surface area to cover the preview.
After that, in our Activity, we set the height of the overlay so that it fills enough of the screen to make the preview appear to be square. We do that by setting the height equal to the height of the preview, minus the width.
Square Preview
private class SquareCameraActivity extends Activity {

    private SurfaceView cameraPreview;
    private RelativeLayout overlay;

    @Override
    public void onCreate(Bundle savedInstanceState) {
        super.onCreate(savedInstanceState);

        // Optional: Hide the status bar at the top of the window
        requestWindowFeature(Window.FEATURE_NO_TITLE);
        getWindow().setFlags(WindowManager.LayoutParams.FLAG_FULLSCREEN, WindowManager.LayoutParams.FLAG_FULLSCREEN);

        // Set the content view and get references to our views
        setContentView(R.layout.square_camera);
        cameraPreview = (SurfaceView) findViewById(R.id.camera_preview);
        overlay = (RelativeLayout) findViewById(R.id.overlay);
    }

    @Override
    public void onWindowFocusChanged(boolean hasFocus) {
        super.onWindowFocusChanged(hasFocus);

        // Get the preview size
        int previewWidth = cameraPreview.getMeasuredWidth(),
            previewHeight = cameraPreview.getMeasuredHeight();

        // Set the height of the overlay so that it makes the preview a square
        RelativeLayout.LayoutParams overlayParams = (RelativeLayout.LayoutParams) overlay.getLayoutParams();
        overlayParams.height = previewHeight - previewWidth;
        overlay.setLayoutParams(overlayParams);
    }

}
Now our view contains a “square” camera preview with a bottom overlay that can contain your buttons and other UI elements.
Square Photos
With our square preview, we’re ready to start taking photos. The problem is that the preview is unrelated to the final product - just because we have a square preview, doesn’t mean we’ll have a square picture. What we’ll have to do is crop the picture when it’s taken to match the preview.
For this, I’ve found that trying to match the preview size with the picture size is going to help get the closest possible match. After you initialize your camera, try to match the preview and picture sizes to a value that is greater than the size of the square we want:
Camera camera = Camera.open(Camera.CameraInfo.CAMERA_FACING_BACK);
Camera.Parameters camParams = camera.getParameters();

// Find a preview size that is at least the size of our IMAGE_SIZE
Camera.Size previewSize = camParams.getSupportedPreviewSizes().get(0);
for (Camera.Size size : camParams.getSupportedPreviewSizes()) {
    if (size.width >= IMAGE_SIZE && size.height >= IMAGE_SIZE) {
        previewSize = size;
        break;
    }
}
camParams.setPreviewSize(previewSize.width, previewSize.height);

// Try to find the closest picture size to match the preview size.
Camera.Size pictureSize = camParams.getSupportedPictureSizes().get(0);
for (Camera.Size size : camParams.getSupportedPictureSizes()) {
    if (size.width == previewSize.width && size.height == previewSize.height) {
        pictureSize = size;
        break;
    }
}
camParams.setPictureSize(pictureSize.width, pictureSize.height);
First we find a preview size that the camera supports, who’s width and height are at least equal to the IMAGE_SIZE that we want. IMAGE_SIZE can be any integer, but know that the higher the value, the less likely we are to find a match. I’ve found that 1024 is a good value for large images, that is supported by most devices. Once we’ve found an adequate preview size, we set it on the camera parameters.
Next we look at the cameras supported picture sizes - the size of the actual pictures that can be taken. We try to find an exact match to the preview size we discovered, which I’ve found in most cases is available. It is possible that there is no picture size that matches the preview size, so in this case we default to the first picture size. Again once we’ve found the right picture size, we set it on the camera parameters.
You can start the preview and handle permissions in accordance with the Android Developer Guide, but once it comes to handling the captured photo, we have one more thing we need to do.
With the byte array returned from the camera picture callback, we need to process the image in such a way that it crops a square from the top of the image, since the top of the preview is all that’s displayed to the user. If we were to cut a square out of the center of the image, it wouldn’t match the preview.
The processing code looks like so:
private Bitmap processImage(byte[] data) throws IOException {
    // Determine the width/height of the image
    int width = camera.getParameters().getPictureSize().width;
    int height = camera.getParameters().getPictureSize().height;

    // Load the bitmap from the byte array
    BitmapFactory.Options options = new BitmapFactory.Options();
    options.inPreferredConfig = Bitmap.Config.ARGB_8888;
    Bitmap bitmap = BitmapFactory.decodeByteArray(data, 0, data.length, options);

    // Rotate and crop the image into a square
    int croppedWidth = (width > height) ? height : width;
    int croppedHeight = (width > height) ? height : width;

    Matrix matrix = new Matrix();
    matrix.postRotate(IMAGE_ORIENTATION);
    Bitmap cropped = Bitmap.createBitmap(bitmap, 0, 0, croppedWidth, croppedHeight, matrix, true);
    bitmap.recycle();

    // Scale down to the output size
    Bitmap scaledBitmap = Bitmap.createScaledBitmap(cropped, IMAGE_SIZE, IMAGE_SIZE, true);
    cropped.recycle();

    return scaledBitmap;
}
Note: You’ll notice an IMAGE_ORIENTATION value here when we rotate the image. Because the camera we’re making here is vertical, when initializing the camera we tell it to rotate 90 degrees when displaying in the preview. The resulting image is also going to need to be rotated to be vertical, so in this case IMAGE_ORIENTATION is 90. It’s important to note however that this is not the best way to accomplish this, and you should detect and modify the camera preview orientation and image processing rotation, programmatically at runtime based on the camera of the device you’re running on. It’s unsafe to assume that all devices will be handled by a straight 90-degree rotation. For more information on how to do this, see the setDisplayOrientation sample code.
Calling this from the onPictureTaken event of the Camera.PictureCallback interface will give us a perfectly square image that matches the preview displayed to the user.
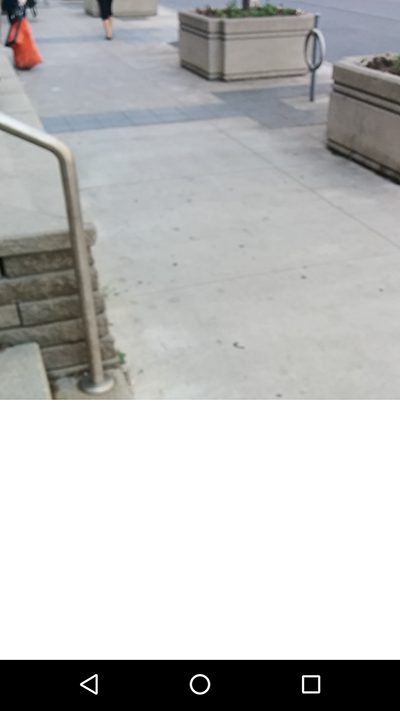
Preview
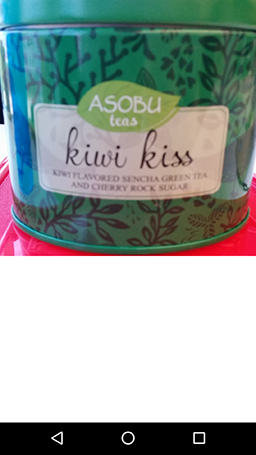
Result

Summary
And that’s how you handle creating a square camera on Android. When I first approached this, I had assumed that there would be built-in functionality to handle square photos, especially with how popular they’ve become in recent years, so I was surprised how much needed to go into this seemingly trivial task.
I didn’t cover the basics of setting up your camera, creating the holder, handling permissions and rotation, and all the other goodies that go along with camera management, but combining this post with the Android Developer Guide should get you exactly where you want with regards to taking square photos on Android!