


#ggo16 GitHub Game Off 2016 - Day 9
As mentioned in my previous posts, I’ve been developing a clicker game for GitHub’s Game Off 2016. Today marks Day 9 of the Game Off, and I’ve managed to make quite a bit of progress.
In summary, here’s what has been done over the last few days:
Finished JSON configuration loading
The JSON file containing all targets, devices, storage units, and upgrades is loaded into the game on startup. There’s nothing too fancy here, I’m simply (pun intended) using the SimpleJSON library to parse the config.json file on startup and initializing some native C# objects and arrays with the data contained within.
While there’s nothing particularly exciting about this, it was quite time consuming to write out all the classes and parsing logic.
Game Saving and Loading
The game now saves! This is a big step because within saving the state of the game, there’s no real point of playing. I wrote a GameState class that’s updated as you play, containing the number of bits you’ve accumulated, your current device and storage unit, the next target you can attack, and a list upgrades that you’ve purchased.
The list of upgrades would be much better suited as a map or dictionary type, but unfortunately the C# serialization implementation (System.Serializable) doesn’t support the Dictionary interface. Instead I’m using a List of custom PurchasedUpgrade objects, each containing the upgrade ID and the quantity purchased. It’s not ideal, and I’ll likely make an attempt to refactor this at some point, but for now its working well enough for a game jam that I’m okay with it.
Additionally, I wrote a SaveManager class that periodically saves the GameState to disk by serializing it to a binary file. When the game starts up, it then reads the file (if it exists) and initializes the game with the same GameState it had when it closed.
Device, Storage, and Upgrade Purchase Menus
The biggest gain in the last few days was the menu system to purchase devices, storage units, and upgrades. This allows the player to spend their accumulated bits in various ways to improve gameplay, which is then stored in the aforementioned GameState class.
With this I’ve also implemented the swapping of device and storage unit models in-game when you make a purchase, and the implementation of three out of five upgrade types.
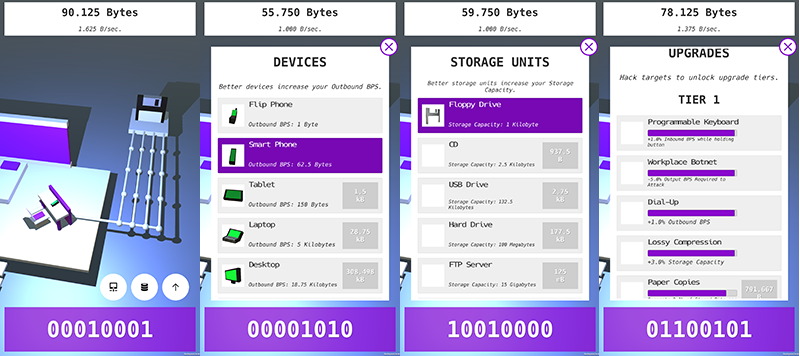
By clicking on one of the three white buttons above the primary clicker button in the first screenshot, you’re taken to the appropriate menu to browse and spend your accumulated bits. The menus are pretty rough around the edges, but as I mentioned in my first post I’m focusing on gameplay first, prior to polish. With limited time both in terms of the Game Off time limit, and my own personal time constraints this month, I’m much more concerned with getting a playable game done.
Upgrade Implementations
For the upgrade management, I wrote a UpgradeState class that is calculated on startup and whenever you make an upgrade purchase. Using the UpgradeState, the gameplay is then adjusted accordingly for each upgrade type based on the upgrades of that type that have been purchased.
For instance, when determining storage capacity prior to allowing a new bit to be stored, the logic looks something like this:
StorageUnit currentStorageUnit = gameState.StorageUnit;
float maxCapacity = currentStorageUnit.capacity * upgradeState.StorageCapacity;
By default the majority of UpgradeState properties are initialized to 1f, such that prior to purchasing any upgrades, the gameplay will not be modified (x * 1f = x). The only exception is the GeneratedBPS property which is initialized to 0f, because by default you generate zero bits per second until you’ve purchased replication upgrades.
Development Tool: “Photo Studio”
For the device and storage unit menus, I display an icon for each that represents what the model will look like in game. My quick and efficient means of doing this was to create a Photo Studio section of the game (destroyed in actual gameplay) available in the editor that simply contains a large white cube. By placing a 3D device or storage unit model, I can professionally take screenshots of the model to then edit and use as the menu icon. It’s dirty, but it gets the job done.
Device Models and Icons
Speaking of which, I finished all of the device models and their icons, as well as the first storage unit (the Floppy Drive). Over the next few days I’ll be aiming to complete the storage unit models (along with their icons), and create the icons for the upgrades as well.