


React Native Tutorial Part 1: Hello, React
Part 1: Hello, React | Part 2: Designing the Calculator | Part 3: Developing the Calculator
The full source code of the tutorial is available on GitHub.
Introduction
React Native promises a whole new way of developing native Android and iOS applications, using (primarily) a single codebase based on the React framework for web. The idea is to write your core application in JavaScript and React Native will compile native iOS and Android applications.
I was admittedly skeptical at first, having plenty of personal and professional experience writing native applications for both platforms in Java, Swift and Objective-C, that this framework would overcome the challenges of the various JavaScript/HTML5 frameworks that came before it. However, after trying it out, I have to say that my skepticism was not warranted, as React Native truly does overcome the problems of previous frameworks that have made the same claim.
The following tutorial will guide you through developing your first React Native application for both Android and iOS. It’s written using React Native version 0.31, the latest at time of writing, and is broken into three parts:
- Part 1 of the tutorial will demonstrate project setup, writing a traditional “Hello World” application, and organizing the code prior to heading into Part 2.
- In Part 2, I’ll be guiding you through the process of designing a calculator app that runs on both platforms, using the latest and greatest that React Native has to offer. The goal is to get you up to speed on the basics of React Native, including flexbox and style sheets, and to give you a starting point from which we can continue to actually develop the calculator’s functionality.
- In Part 3, we’ll develop the actual calculator implementation, including listening to touch events, performing the arithmetic, and updating the UI using React Native’s state.
The Application
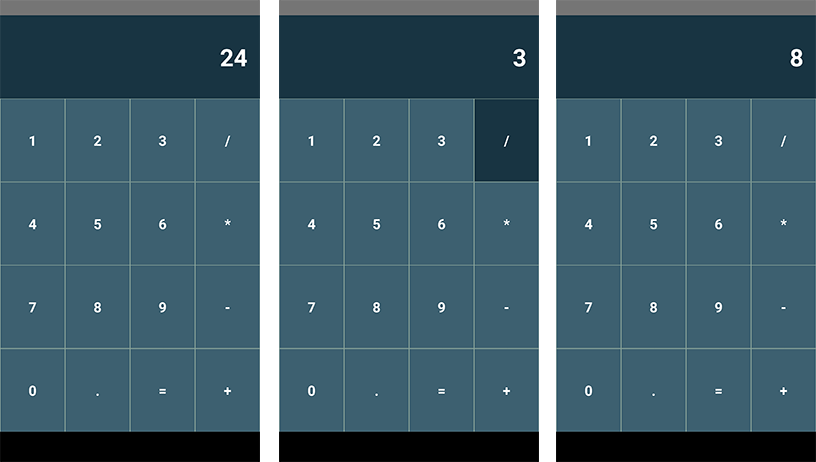
This is the application we’ll be building. A calculator is simple enough that you should be able to get through the tutorial relatively quickly and smoothly, but provides enough challenge that we can hopefully learn some new things along the way. I recommend following the guide as written, and then experimenting with the application on your own afterwords.
Setup
The first thing we’ll need to do is install React Native.
The guide linked above provides instructions for Mac, Windows and Linux users, as well as instructions for preparing your Android and iOS environments.
For Mac users, you should be good to go after running the following three commands: For users on Windows or Linux, please follow the guide linked above.
$ brew install node
$ brew install watchman
$ npm install -g react-native-cli
Once you’ve completing the React Native installation, we can go ahead and create our project:
$ react-native init ReactCalculator
After a moment, you should have a project setup like so:
$ cd ReactCalculator
$ ls -l
drwxr-xr-x+  10 kylewbanks  staff    340 Aug  7 11:56 android
-rw-r--r--+   1 kylewbanks  staff   1106 Aug  7 11:56 index.android.js
-rw-r--r--+   1 kylewbanks  staff   1072 Aug  7 11:56 index.ios.js
drwxr-xr-x+   5 kylewbanks  staff    170 Aug  7 11:56 ios
drwxr-xr-x+ 585 kylewbanks  staff  19890 Aug  7 11:56 node_modules
-rw-r--r--+   1 kylewbanks  staff    239 Aug  7 11:56 package.json
A few things to note here:
- React Native uses npm for package management, hence the node_modules directory.
- The android and ios directories contain your typical Android/iOS projects, which can be opened and run in Android Studio/Xcode, respectively.
- The index.android.js and index.ios.js files contain the main entry-point of our React Native source code for Android and iOS.
Go ahead and run the application on your preferred device/simulator using the following command(s):
# For Android
$ react-native run-android

# For iOS
$ react-native run-ios
You’ll notice a new terminal window open up that’s running the React Native packager. You can just leave this terminal to run in the background, and it will handle the packaging and live-reloading of your application as you write your React Native code.
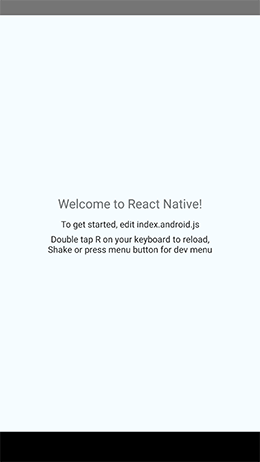
Assuming everything was setup correctly, you should see something like so:
Go head and give the device a shake and you should see some developer options appear. These can be incredibly useful when developing and debugging React Native applications, and I highly recommend you try them out, but we won’t be going over them in this tutorial.
Hello, React
Alright, so we have our application but it isn’t all that useful right now. Go head and clear the contents of the index.android.js and index.ios.js files, as we’ll be starting from scratch in order to better understand how the application works.
We’ll start off by importing some packages that we’ll need to get started. In each of the two index files, replace the current contents with the following:
import React, { Component } from 'react';
import {
    Text,
    AppRegistry
} from 'react-native';
React Native uses ES6, so if you’re unfamiliar with ES6 imports this may look a little unfamiliar to you, but it should be pretty straightforward. What we’re doing is importing React and Component from the react package, and Text and AppRegistry from the react-native package.
With the imports in place, we can go ahead and define our ReactCalculator component. A component is essentially a view, that can contain subviews and sub-components. Defining our root ReactCalculator component looks like so:
class ReactCalculator extends Component {

    render() {
        return (
            <Text>Hello, React!</Text>
        )
    }

}
ReactCalculator subclasses the Component class, and overrides the render function to render it’s UI. For now, we are rendering a simple Hello, React! text label, but this render function will grow and become more complex soon enough.
Finally, before we can run the application again, we need to register ReactCalculator with the AppRegistry that we imported above. I won’t go into much detail with the AppRegistry in this tutorial, because you generally only need to register your root Component, so for now we can just set it and forget it:
AppRegistry.registerComponent('ReactCalculator', () => ReactCalculator);
The reason we do this is so that the native Android and iOS code, which you can find in the aforementioned projects that react-native init created for us, are looking for the root component identified by ‘ReactCalculator’ on startup. The native code initializes the application with the registered component, and from then on we can stay mostly in the React Native codebase, and we no longer need to register any Component classes.
Alright, go ahead and run the application again and you should have a nice and ugly Hello, React! message on the screen:

Reorganizing
Alright so we’ve written our first little React Native application, but it’s a really big pain that we have to duplicate the code in the index.android.js and index.ios.js files. Luckily, as mentioned above, we have the ability to import source code from other packages! Let’s create a new src/ directory, and a ReactCalculator.js file inside:
$ mkdir src
$ touch src/ReactCalculator.js
Let’s move the content of the index.android.js and index.ios.js files into the new ReactCalculator.js, so we no longer have duplicated code:
// src/ReactCalculator.js

import React, { Component } from 'react';
import {
    Text,
    AppRegistry
} from 'react-native';

class ReactCalculator extends Component {

    render() {
        return (
            <Text>Hello, React!</Text>
        )
    }

}

AppRegistry.registerComponent('ReactCalculator', () => ReactCalculator);
Now in our index.android.js and index.ios.js files, we simply need to import the ReactCalculator source code:
import ReactCalculator from './src/ReactCalculator';
Go head and re-run, and you should see the same Hello, React! message printed on your device. Now we can continue to develop our application without needing to duplicate every line of code.
In React Native, when you import a source file such as ReactCalculator.js or an asset such as an image, React Native will first check if there is a corresponding ReactCalculator.android.js or ReactCalculator.ios.js for the platform the code is running on, and import that instead. This allows you to have source files or assets that are specific to a certain platform. For our purposes today, we won’t be creating any platform specific functionality, so we will simply use .js extensions for our source files to indicate that the source code is the same for both platforms.
Conclusion
At this point we’ve got a clean React Native project setup, and we’re ready to start adding some real functionality into the app. Part 2 of the tutorial continues from here, where we’ll begin laying out our calculator app.
For Part 2 of the React Native tutorial, Click Here.