


React Native Tutorial Part 2: Designing a Calculator
Part 1: Hello, React | Part 2: Designing the Calculator | Part 3: Developing the Calculator
The full source code of the tutorial is available on GitHub.
Introduction
In Part 1 we went through the setup of a “Hello, React!” application. In Part 2, we’ll continue from where we left off and begin laying out and styling our calculator app.
Laying out the Calculator
The first thing we’ll want to do is layout the calculator. The calculator is going to have two primary sections:
- The “display” section, where we’ll see the input we enter and the result of our calculations.
- The “input” section, where we’ll enter numbers and mathematical operations.
Let’s open up the ReactCalculator.js source file and create the two sections using flexbox. Go ahead and remove the text label from the render function, and replace it with the following:
render() {
    return (
        <View style={{flex: 1}}>
            <View style={{flex: 2, backgroundColor: '#193441'}}></View>
            <View style={{flex: 8, backgroundColor: '#3E606F'}}></View>
        </View>
    )
}
What we’ve done here is create a container View that wraps the two sections I mentioned earlier, and takes up the full width and height available by styling it with flex: 1. Each Component can only have one root View, hence why the container is necessary.
Inside the container, we create two Views that take up 20 and 80 percent of the root container, by styling them with flex: 2 and flex: 8 respectively. In order to better see the two distinct components, we assign each a background color as well.
You’ll also need to import the View class from react-native, by adding it to the existing imports like so:
...
import {
    View,
    Text,
    AppRegistry
} from 'react-native';
If you run the application now, you should see the following:

Alright so now we’re starting to look a little like a calculator, but before we continue, we should clean up those styles. The inline styling is great for quickly checking something out, but it can quickly grow into a big ugly mess if it gets out of hand. Luckily we aren’t restricted to defining the full styles inline like this, as we can create a StyleSheet that can then be referenced. This also allows us to reuse styles across several components, which we’ll need for our buttons shortly.
Create a new source file called Style.js in the src/ directory, and import the StyleSheet class:
import { StyleSheet } from 'react-native';

var Style = StyleSheet.create({
    rootContainer: {
        flex: 1
    },

    displayContainer: {
        flex: 2,
        backgroundColor: '#193441'
    },

    inputContainer: {
        flex: 8,
        backgroundColor: '#3E606F'
    }
});

export default Style;
You’ll notice at the bottom we export the Style so that it can be used by other source files that import Style.js, which is exactly what we’re about to do.
Back in the ReactCalculator.js class, let’s update our render function to reference the styles we defined in Style.js:
import Style from './Style';
...

<View style={Style.rootContainer}>
    <View style={Style.displayContainer}></View>
    <View style={Style.inputContainer}></View>
</View>
Adding the Input Buttons
Alright so our base layout is setup and our styles are externalized, so it’s time to add some buttons. We’re going to start by creating an InputButton class in the src/ directory that will be used for displaying each button on the calculator:
// InputButton.js

import React, { Component } from 'react';
import {
    View,
    Text
} from 'react-native';

import Style from './Style';

export default class InputButton extends Component {

    render() {
        return (
            <View style={Style.inputButton}>
                <Text style={Style.inputButtonText}>{this.props.value}</Text>
            </View>
        )
    }

}
Two things to note here:
- We export the class directly using export default on the class definition.
- The Text view uses this.props.value. Props are essentially static data that we can pass to child components, as we’ll see when we return to the ReactCalculator class shortly.
Let’s add some styles to Style.js for our InputButton:
// Style.js
var Style = StyleSheet.create({
    ...

    inputButton: {
        flex: 1,
        alignItems: 'center',
        justifyContent: 'center',
        borderWidth: 0.5,
        borderColor: '#91AA9D'
    },

    inputButtonText: {
        fontSize: 22,
        fontWeight: 'bold',
        color: 'white'
    }
});
With our reusable button defined, we can go back to the ReactCalculator and add our buttons.
Rather than defining the button one-by-one in the render function, let’s try to do this a little more programatically.
First we will define a multi-dimensional array that represents the rows and inputs that will be displayed in the calculator. Next, we’ll create a function to dynamically generate the buttons, and call this from within render. This new function, _renderInputButtons, will iterate each row in the inputButtons array, and for each input in the row, create an InputButton and add it to the row.
Let’s take a look:
// ReactCalculator.js
...
import InputButton from './InputButton';
// Define the input buttons that will be displayed in the calculator.
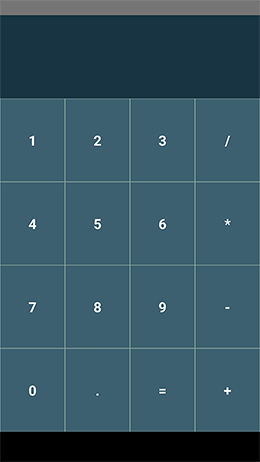
const inputButtons = [
[1, 2, 3, '/'],
[4, 5, 6, '*'],
[7, 8, 9, '-'],
[0, '.', '=', '+']
];
class ReactCalculator extends Component {
render() {
return (
<View style={Style.rootContainer}>
<View style={Style.displayContainer}></View>
<View style={Style.inputContainer}>
{this._renderInputButtons()}
</View>
</View>
)
}
/**
* For each row in `inputButtons`, create a row View and add create an InputButton for each input in the row.
*/
_renderInputButtons() {
let views = [];
for (var r = 0; r < inputButtons.length; r ++) {
let row = inputButtons[r];
let inputRow = [];
for (var i = 0; i < row.length; i ++) {
let input = row[i];
inputRow.push(
<InputButton value={input} key={r + "-" + i} />
);
}
views.push(<View style={Style.inputRow} key={"row-" + r}>{inputRow}</View>)
}
return views;
}
}
Note: The key on the Components within _renderInputButtons is required when you are creating an array of Components, and must be unique to each Component in the array.
This demonstrates how to dynamically create Views, and how to call functions from within your render function. This allows us to create incredibly complex and state dependent interfaces!
If you look closely, you’ll also know we need a new inputRow style in Style.js:
// Style.js

...
    inputRow: {
        flex: 1,
        flexDirection: 'row'
    }
...
Alright, give the application a run and you’ll see the calculator laid out like so:
Conclusion
At this point we have our calculator laid out and styled, but we still need to develop the actual functionality. In Part 3 of this tutorial, we’ll continue by adding touch event handling, implementing State for UI updates, and perform the core arithmetic logic based on user input!
For Part 3 of the React Native tutorial, Click Here.